
My Everyday Sourdough Bread Recipe
By Amanda Paa – Updated August 12, 2026
Jump to Recipe
This post may contain affiliate links. Please read my disclosure policy.
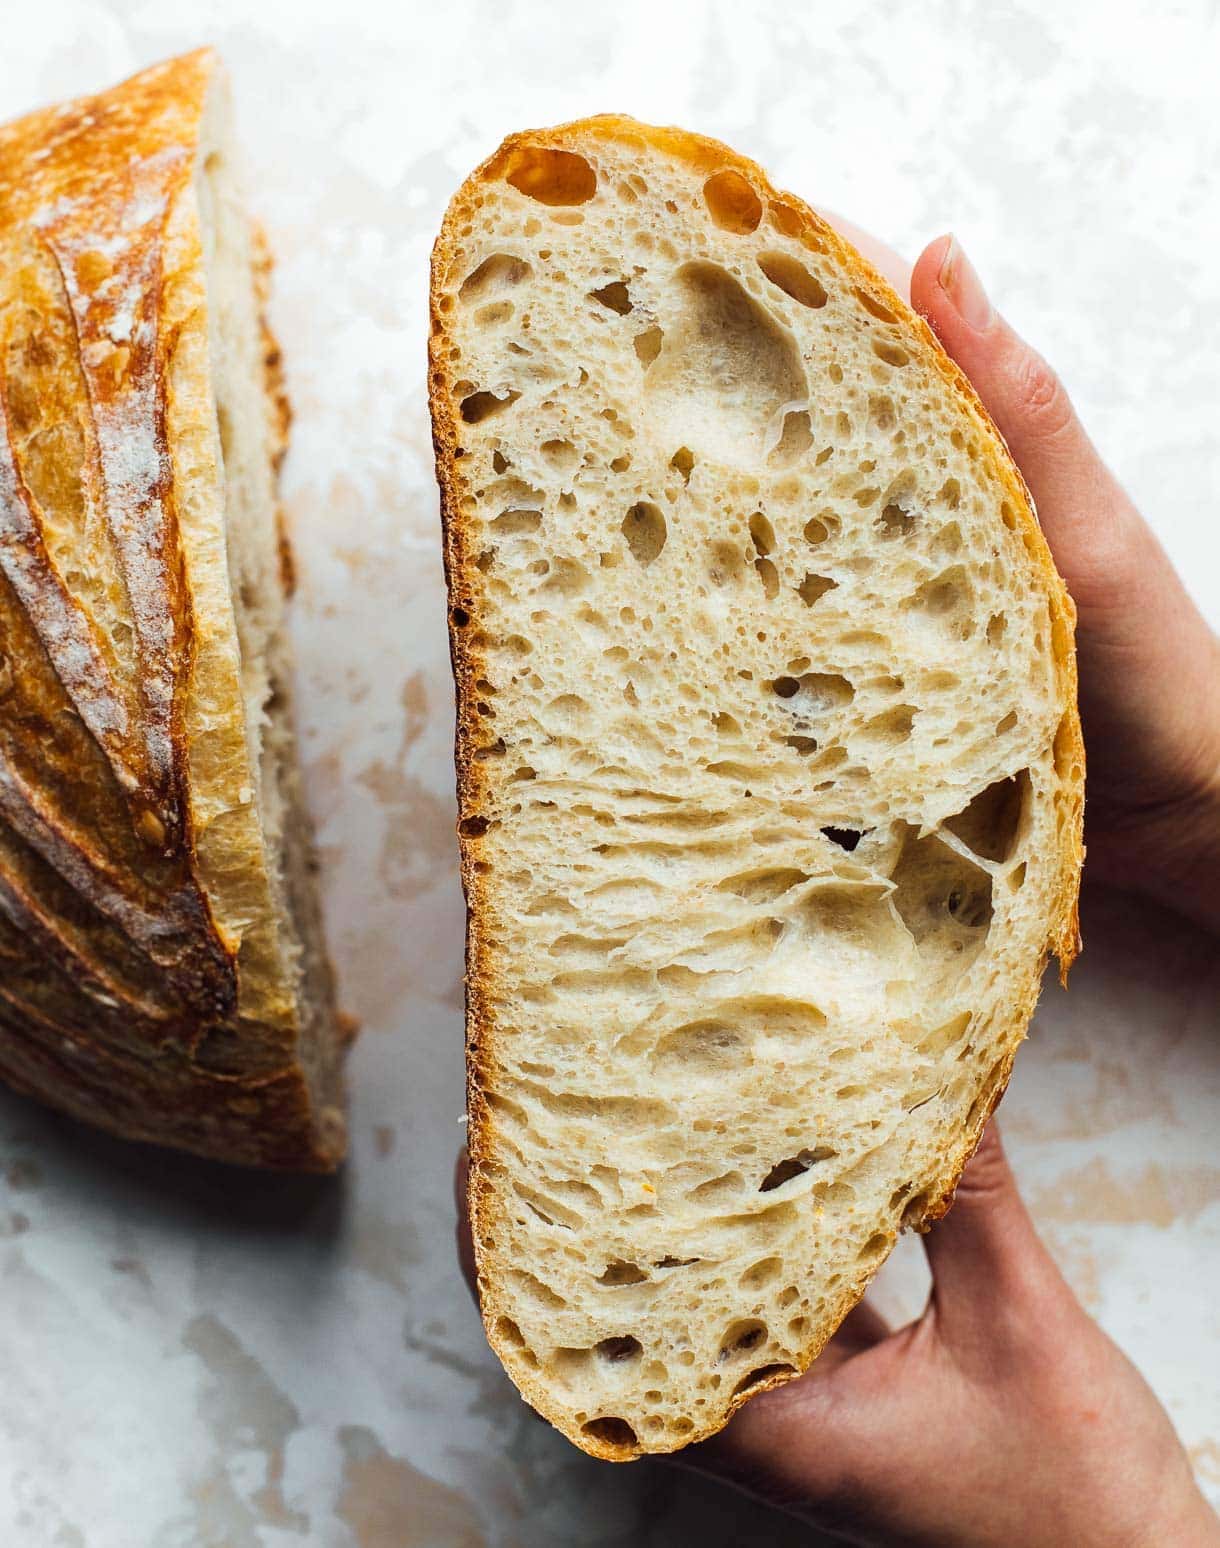
This straightforward sourdough bread recipe is a staple in our house. Made with sourdough starter, this naturally fermented bread has a fluffy, airy interior and crackly crisp crust. All the steps of making the bread are detailed out, as well as sourdough tips for beginners.

You know those recipes you know by heart and never have to look up? For me that’s this basic sourdough bread recipe with starter, the one I make every week, that’s completely achievable for beginners too. If you’ve been dreaming of fluffy, bouncy, true sourdough bread, you can make that happen in your own kitchen! I promise you.
Sourdough is all about learning by doing, and every time you get your hands in the dough, each step will make more sense.
I made my first sourdough loaf over 6 years ago, and I haven’t stopped baking. In this post, I’ll coach you through the basic steps and leave you with my favorite recipe. Then you can make your way to whole grain recipes, like my delicious rye sourdough and spelt sourdough recipes.
This basic sourdough recipe is made from mostly bread flour, with just a small amount of whole wheat or whole grain flour to give it some additional flavor and color. This amount is super versatile depending on what flours you have in your pantry. I like to use einkhorn, spelt, red fife, or khorasan.
First things first, you’re going to need an active sourdough starter. I suggest asking a friend who has lovingly fed and maintained their starter or purchasing mine so you can get baking right away instead of spending several weeks getting your started. You’ll be able to use to make sourdough english muffins, sourdough cinnamon rolls, and lots of sourdough discard recipes!
I ship my 13+ year old starter to anyone in the U.S! You can order it here.
While you’re getting started, this post with 5 Essential Sourdough Starter Tips for Beginners that I wrote may be helpful and this Sourdough Starter video. Both should answer many of your questions!
It’s essential for your starter to be healthy and active, so that is has the ability to make your dough rise. If your sourdough has been in the refrigerator, take it out 2 days before you plan to bake and begin feeding it again.
The biggest mistake I see beginner sourdough bakers make is:
Judging the end of proofing by time rather than how much the dough has risen. The problem with time is that every loaf you make, the temperature of your home and the temperature of your dough is going to be different, therefore it will rise at a different rate.
I highly, highly recommend getting a tall-sided bucket for your dough to rise in rather than a bowl because you’ll be able to accurately judge how much the dough has risen. With a bowl, the dough rises outward then up, rather than straight up. When I started using a bucket for the bulk fermentation, my finished loaves improved dramatically.
Your dough is finished rising on the countertop, the end of bulk fermentation when:
- the dough has risen to just short of doubling
- it has one or two bigger bubbles poking up around the edges of the dough
- the top surface is every so slightly domed rather than flat
- the dough has small tiny bubbles throughout it
- the dough looks alive
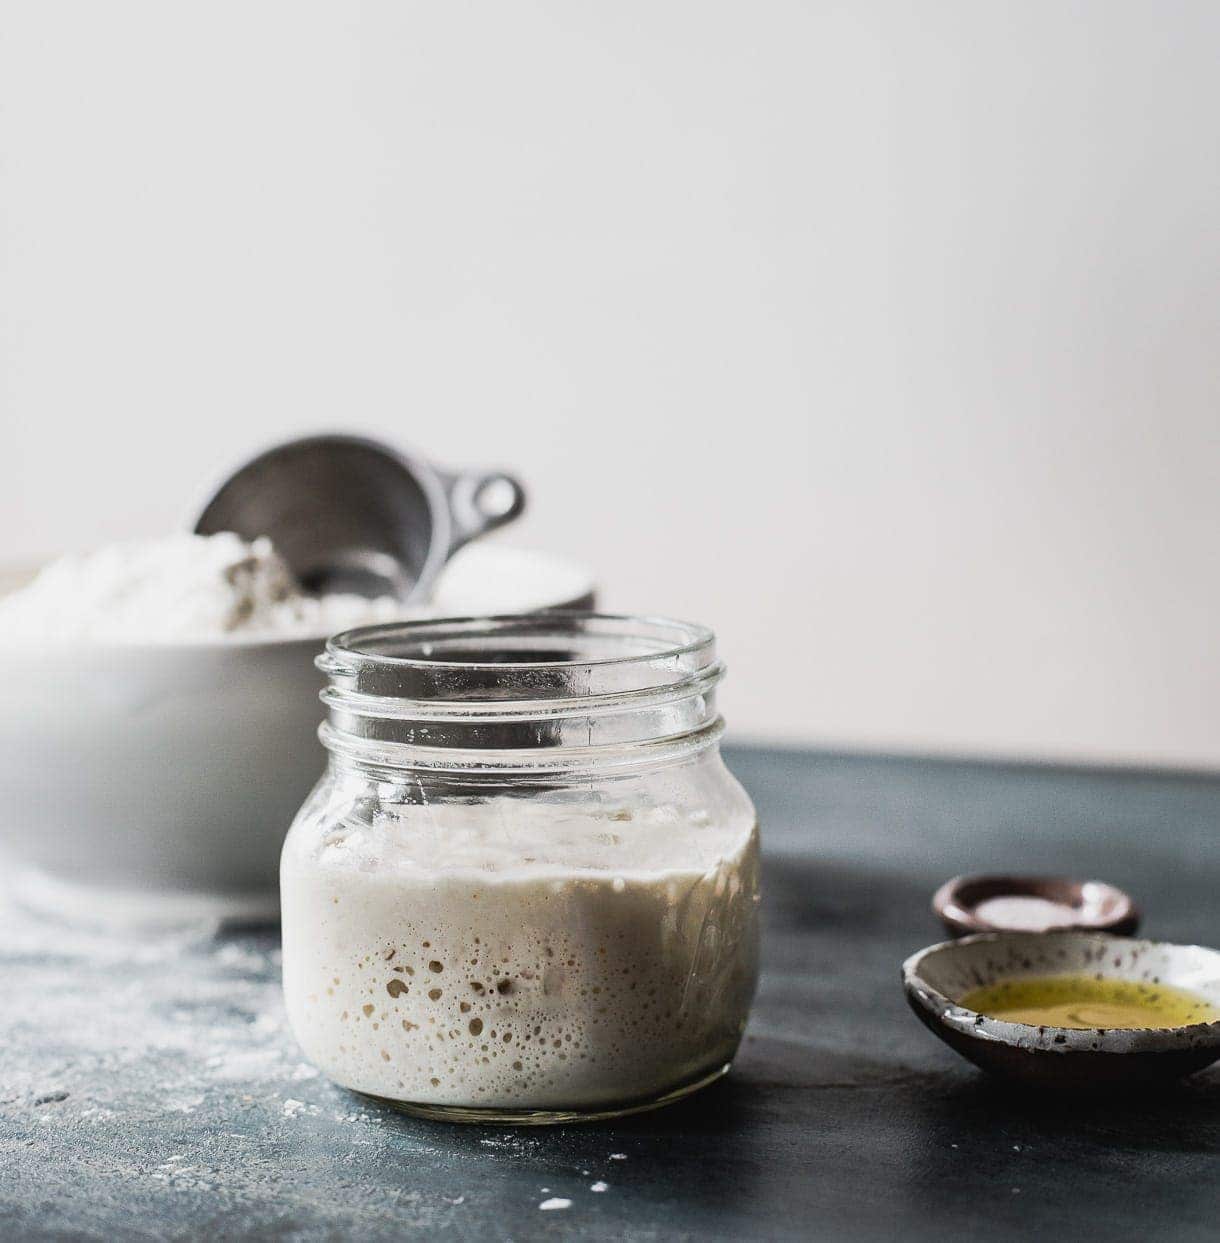
How do I know when my sourdough starter is ready to bake with?
The answer to this question comes from both experience and observing the starter behave, to understand how it reacts to feeding/not feeding, and temperature.
You can just look for these hints that the starter will give you!
a. It will have at least doubled in size. This will take place over 6 hours if the temperature in your house is around 72 degrees. If it’s cooler in your house, it will take a bit longer. I put a rubberband around the jar, to mark the spot it’s at right after feeding. Then, as time passes, you’ll be able to keep track of how much it’s rising.
b. You will see bubbles throughout the sides of the jar, and on top. The top will be a bit poofy and domed. When you stir it with a spoon, it will feel like roasted marshmallows. And sound like it too!
With the final rise on the counter, how do I know when my dough has risen properly and can be scored and into the oven for baking?
There’s an easy test for this stage too, using a fingerprint. Gently press a floured thumb into your risen dough. You don’t need to press down further than 3/4 inch.
If it indents and gradually releases, but still holds a finger shape, you’re ready. If your fingerprint jumps right back up to flat, it needs more time to rise. If your fingerprint indents and doesn’t bounce back at, it is overproofed. That’s okay, just get it in the oven! It will still taste delicious, it will just not rise as well while baking
Once your sourdough starter is ready to bake with, here you’re ready for baking. You can watch this step-by step tutorial of me making this sourdough bread recipe to help you as well.
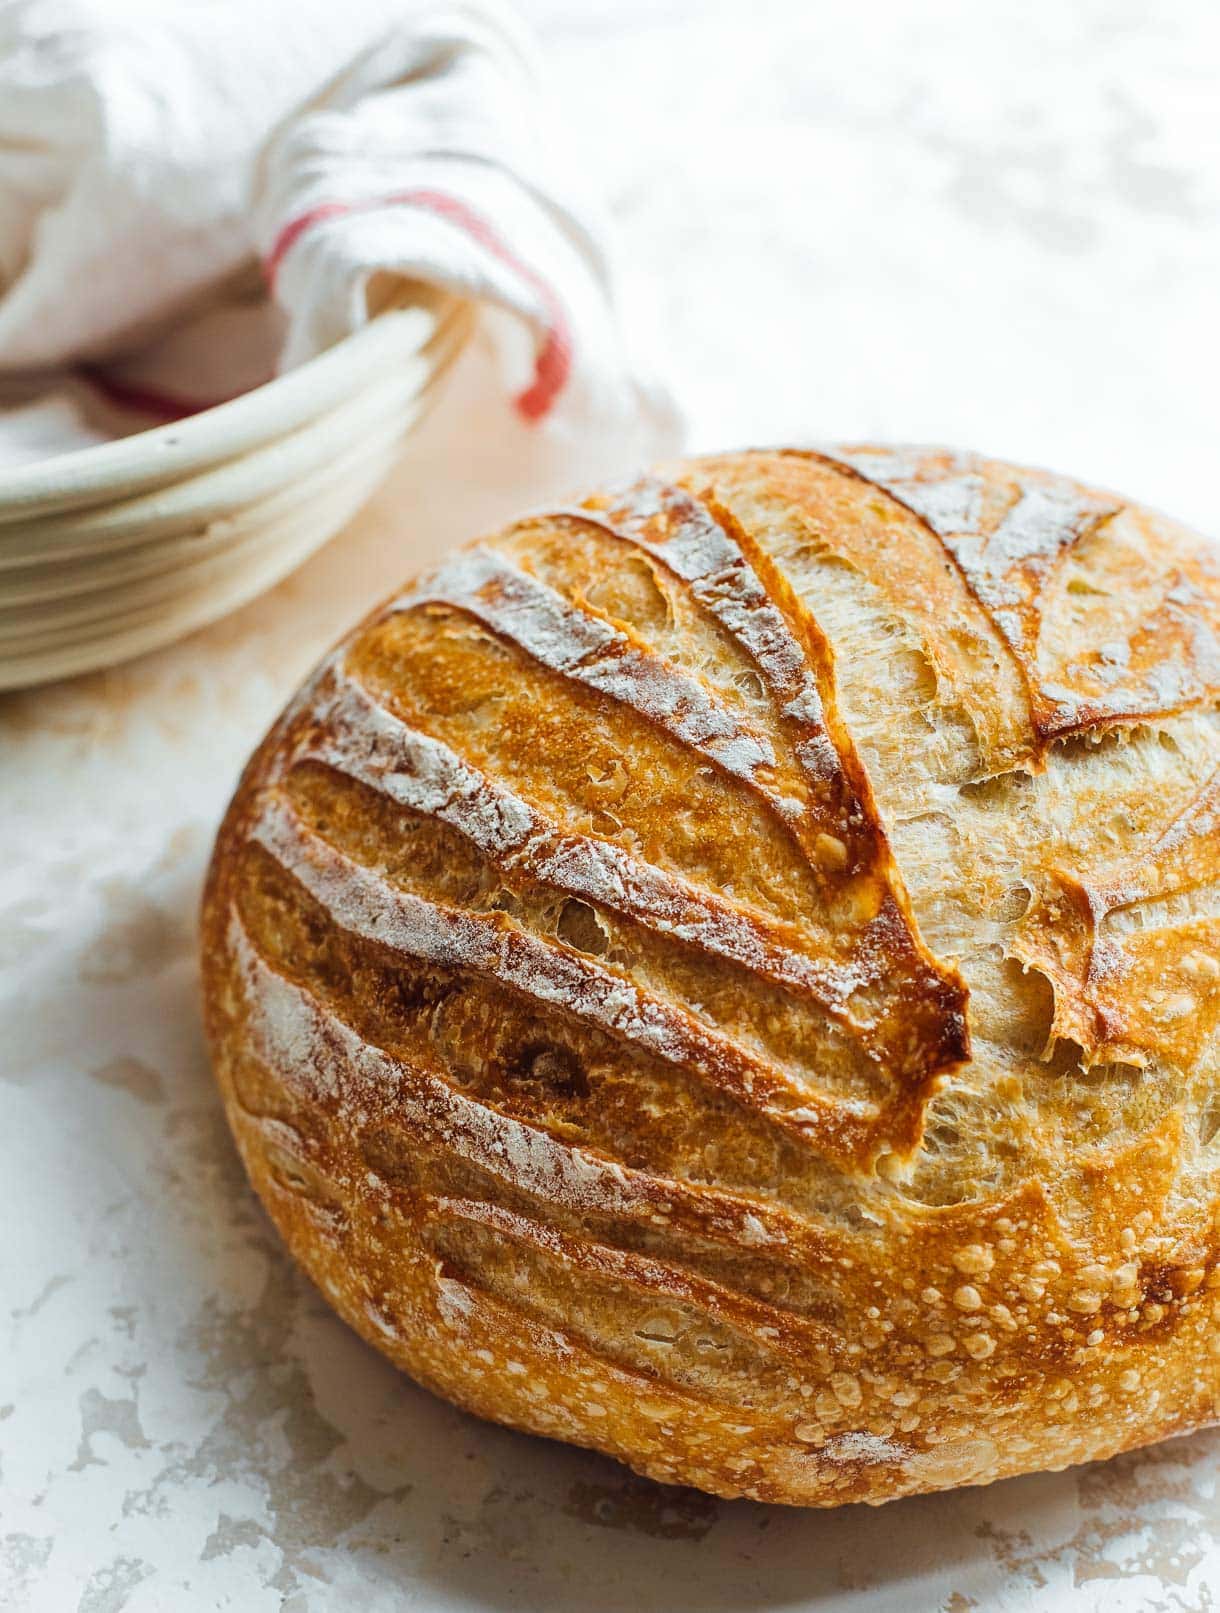
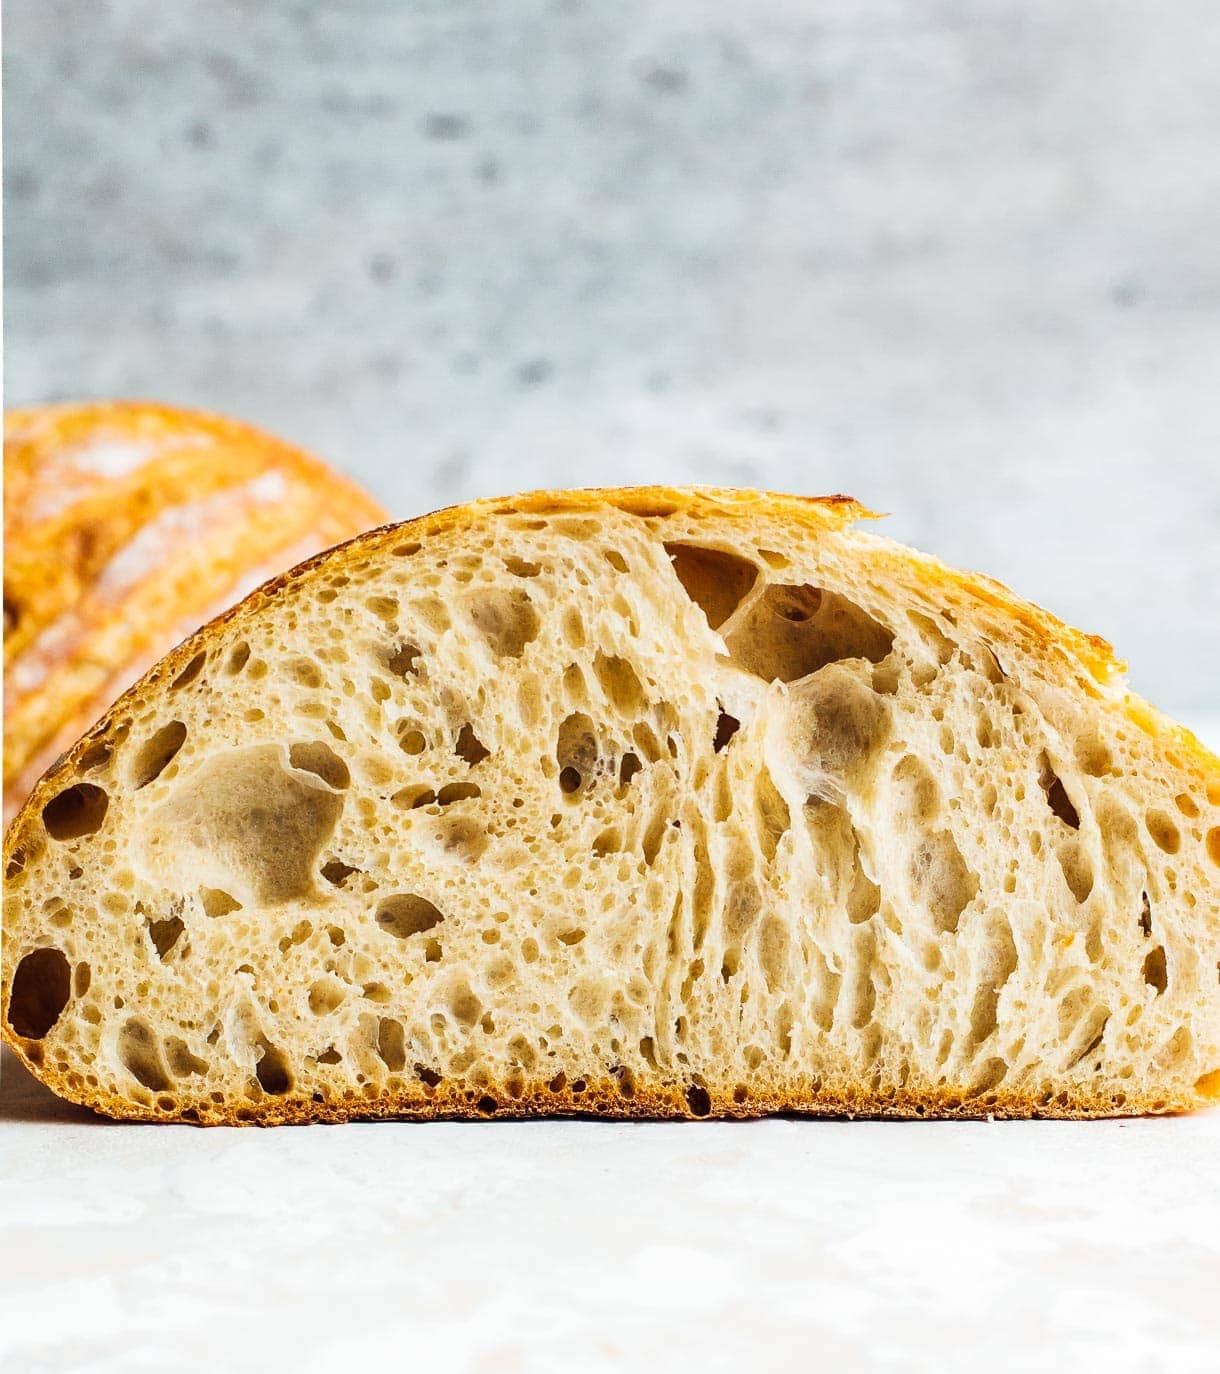
This recipe is an adaptation from many recipes and techniques I’ve tried, starting first with Artisan Sourdough Made Simple, The Perfect Loaf, then Tartine, Bake With Jack, and the list goes on. You’ll find what works best for you over time, as well.
And the beauty of sourdough is that no bake with ever be exactly the same as the last, because you’re working with an amazing living culture!
Feel free to ask me any questions you might have, or reference some of my other sourdough resources:
- Sourdough Videos
- Top 10 Sourdough Starter Tips
- Honey Walnut Sourdough Bread
- Whole Wheat Sourdough Bread
- Jalapeno Cheddar Sourdough Bread
Yield: 1 loaf
Equipment
Ingredients
- 50 grams active sourdough starter
- 305 grams filtered water at temperature, around 85 to 90 degrees F
- 370 grams bread flour
- 30 grams whole wheat flour*
- 7 grams fine sea salt
Instructions
- In a large bowl, mix starter and water with a fork, until starter is dispersed. Add flours, mixing with a spatula first. Then with your hand until a shaggy dough is formed, just enough so that flour is not visible.
- Cover with a damp cloth and let sit for 30 minutes.
- Once rested, add salt to top of dough and liberally knead the dough for two minutes. Then perform your 1st of stretch and folds. Let rest for 30 minutes.
- Then perform your 2nd set. Let rest for 30 minutes. Then perform your 3rd set. Let rest for 30 minutes. Then perform your 4th and final set. Here is a video of how to do a stretch and fold. It is easy!
- After those stretch and folds are completed, you will let the dough go through its long proof (rise) in a bowl or my preferred vessel, a tall sided bucket so I can tell how much the volume is increasing. on the counter – this stage also known as the bulk fermentation. You are looking for your dough to be finished proofing when: it has until just about doubled in size, like a 85 to 95% increase, has a glossy look to the top, is slightly domed on top, and a bubble or two will be poking out the edges of the time. It should jiggle a bit as well when you shake it. These are the signs to look for, rather than going off of time. A specific length of proofing time cannot be given because the temperature of water you used and air temperature in your home will be different for everyone, and will also be different for you every time you bake. If your house is between 72 to 76 degrees F, that is ideal for the wild yeast to be happy and the double will rise quicker than if it cooler in your home. That means sometimes it might take 6 hours to finish proofing, maybe in summer, and over 10 hours in the depths of winter.
- After the bulk fermentation is finished, you'll gently move the dough out of the bowl onto a floured work surface. Let the dough rest there for 10-15 minutes.
- Then, shape the dough. You can watch the video below to learn how to shape it into a round boule.
- Once shaped, use a bench scraper to put the dough into a banneton (proofing basket) that has been liberally dusted with rice flour, seam side of the dough facing up (so the top of the dough is what is touching the bottom of banneton) when it is placed in banneton.
- For best results, I like to do a cold final proof in the refrigerator, overnight. Put the banneton with dough, in a plastic bag or covered with a shower cap (this ensures the dough will not dry out) in the refrigerator and let the final rise happen. You can bake ANYTIME the next day. OR you can do the final proof on the counter, covering with a damp cloth. You are looking for about a 15% rise in the dough, and or it to puffy on top. This is typically between 1 to 2 hours, depending on the warmth of your home.
- Once your dough is finished proofing, preheat your oven with dutch oven in it to 450 degrees F. (Keep the dough in the refrigerator if you did the overnight rise, until is preheated. Cold dough is much easier to score than warm dough, and you also don't want to let it proof more at room temperature.)
- Wait until oven is preheated, then place parchment over the top of your banneton with dough in it and flip over, so that the seam side is now on the parchment paper and you are able to score the top of the dough.
- Score the dough with a bread lame, making sure to go at least 1/2 inch deep in a few spots so that dough can release gases. Otherwise your bread will not rise.
- Place dough on parchment paper into a dutch oven, and put cover on it. Bake for 20 minutes, covered at 450 degrees F. Then remove cover, turn heat down to 425 degrees F, and bake for 25 more minutes, until bread is golden brown and crackly.
- Remove from oven and place load on a cooling rack. Let cool for AT LEAST ONE HOUR before slicing. Otherwise the crumb will be squished and the texture will be gummy.
Notes
*You can also use whole grain einkorn, spelt, red fife, or khorasan flour.
Did you make this?
tag @heartbeetkitchen on instagram and hashtag it #heartbeetkitchen
April 8, 2020

Howie
January 7, 2024
Hi! Long time reader, first time commenter.
I’ve been making this recipe for over a year now and love the flavor. My main problem still is oven spring. I think i let it rise on the counter too long overnight for the first rise so im going to try out the fridge method for the second rise instead. My question is whether it needs to rest from the fridge or if it goes immediately into the hot dutch oven. Also, how critical is it to use a ceramic dutch oven as opposed to a stainless steel one? Couod that also be affecting my oven spring?
Amanda Paa
January 7, 2024
Hi Howie! A few things, I would try the final rise in the fridge for better control on the proofing, which result in better oven spring. Also, a cast iron dutch oven (this is my favorite affordable option) retains heat much better than stainless steel, so that is affecting your oven spring as well.
Olesha Karringten
January 6, 2024
This is one of the easiest recipes it is so good I absolutely love it and it’s very dependable and reliable. Sometimes I switch out some of the wholewheat for rye (only after the autolyse ) only thing that i would find helpful would be bulk forment time after all stretch and folds …. I feel like a temp chart with the time you need after would help or some pics …. Because occasionally i am needing more or less time but i cant see it i only can tell after i bake
Marina
January 6, 2024
Hello! I have been baking bread for years. I got into it after I received as a gift can four cashes book flower, water east salt. It uses much of the same methodology as you describe in this recipe, with few minor differences. So, here are my questions:
1. What are the technical specs (numbers) of the bread flour you are using?
2. Why do you use rice flour to dust the basket?
3. The recipe calls for using an oval proofing basket. Does it mean you have an oval cast iron Dutch oven that you bake it in? In the picture it looks like the bread was round. I have always used a round proofing basket with a round 5 quart Dutch oven.
Also, when I put the dough ball in the proofing basket, I placed it seem down. If you place it seem up, wouldn’t that Gas escape while it’s proofing?
Thank you for your reply.
Joe
January 5, 2024
Hi,
Thanks for the recipe. I made my first sourdough with it. It was very good but felt very dense. I think I failed to knead it long enough as it didn’t hold a ball shape very well.
Do you have any recommendations for how to convert this into a cheddar and garlic boule? Would I need to modify any water content if I used fresh garlic? Thank you!
Amanda Paa
January 5, 2024
Hi Joe! You could use my Jalapeno Cheddar Sourdough recipe, and leave out the jalapenos. Add fresh garlic at same time you add the cheddar. You wouldn’t need to modify water.
Lesley
January 3, 2024
I’ve tried many recipes and this is the most fool-proof recipe I’ve tried! It’s now my go-to. Super easy to follow and doesn’t require unnecessary steps. Thank you so much!!!
Amanda Paa
January 4, 2024
So great to hear, Lesley! Thanks for making the recipe.
Liz
December 29, 2023
Hi! I’ve tried this recipe and the Jalapeño & cheddar several time and love them! But I was wondering if you preheat your dutch oven? I haven’t tried the recipes without preheating, but I don’t preheat my dutch oven for 1 hour like I use to either.
Amanda Paa
December 30, 2023
hello! i just preheat my dutch oven in the oven until it reaches the temp the recipe calls for. i do not preheat for an hour.
Patricia Suiter
December 22, 2023
I make this loaf every week and have it memorized by now. It’s so easy and a great recipe for beginners. I have added jalepeno and cheese to it for a lovely alternative version. I was really intimidated by sourdough at first but after making this for a few years now, i can whip this up in my spare time and know the look and feel of when to move to the next step. thank you for your helpful videos and tips!
Amanda Paa
December 22, 2023
Yay, that’s so great to hear Patricia! I do have a recipe for Jalapeno Cheddar Sourdough if you wanted to follow that, too! Enjoy your next bakes.
Kristen
December 6, 2023
I don’t have whole wheat flour – can I substitute with the all purpose flour I use to feed my starter?
Amanda Paa
December 6, 2023
You can just use all bread flour!
Elena
November 25, 2023
Thank you for this recipe, the result is always amazing! Question – if using freshly milled flour – what type or what combination of wheat berries would you use for this recipe?
Amanda Paa
November 26, 2023
Hi Elena! I’m so glad you enjoy this recipe! I’ve made my whole wheat sourdough before with fresh milled flour according the recipe, that may help you!
Linda Wigg
November 13, 2023
Hello Thank you! Your recipe and instructions are simple and understandable. However, I wondered, do you bake the dough straight from the fridge or let it come to room temp first? Thanks again.
Amanda Paa
November 13, 2023
Hi Linda! Yes, straight from fridge to scoring to oven. You do not want to let it warm to room temp as room temp dough is difficult to score, and you also risk overproofing.
David Grinvalsky
November 12, 2023
Two for two Amanda!
Great recipe!!
Rita
October 29, 2023
This is the best most authentic sourdough I’ve made so far! Crisp crust soft crumb. Found it a little wet but it baked up beautifully.
Jesse
October 24, 2023
Hi Amanda. Your tutorials and exuberance have my confidence level peaking. But I do have a question. When I feed my starter a few times to activate prior to using, do I discard before every feeding? And how frequent should the feedings be?
Amanda Paa
October 24, 2023
hi jesse! yes, that is correct; you will discard every time before feeding. this post, sourdough starter tips for beginners will help answer a lot of your questions!
Kinsey
October 19, 2023
So you do preheat the Dutch over in your oven before baking?
Amanda Paa
October 19, 2023
Yep!
Abby
October 16, 2023
I’d like to add garlic powder and fresh rosemary to this. At what point do you recommend adding and do you have ideas on how much? Thanks!
Amanda Paa
October 16, 2023
Hi Abby! You could mix garlic powder in when you add the flour; I’d start with a 1/2 teaspoon. And then rosemary in on the 3rd set of stretch and folds, maybe a tablespoon of minced fresh rosemary. Start there and see if that is flavorful enough for you!
Abby
October 16, 2023
Awesome, thanks so much! I made your jalapeno cheddar recipe a few days ago and it was a huge hit! Looking forward to trying this one.
Jamie
September 6, 2023
Miss ma’am, may I please thank you from the bottom of my baking heart. An open crumb sourdough is something I have been trying to achieve for nearly a year. Countless recipes and countless failures. This recipe worked for me the very first time I tried it, and the second time. Im overjoyed that I finally feel successful, thank you so much for sharing this recipe with us all. 🙏🏽 10/10, everyone try it! If this is the one comment you see or read, this is a sign, go feed your starter and make this bread!!!!!
Amanda Paa
September 6, 2023
So glad to hear you had baking success, Jamie! Thank you for making the recipe. Enjoy the sourdough journey!
Peggy Powell
July 20, 2023
What’s the deal with heating Dutch oven before baking or not.
Joelle Bassit
June 21, 2023
Hello , just wanted to check when heating the oven before hand, do you use the top and bottom or just the bottom oven?
Amanda Paa
June 21, 2023
Hello! Both top and bottom.
Michelle
June 14, 2023
Excellent recipe! The instructions made all the difference. Light and crunchy. Perfect! Thank you!
Amanda Paa
June 14, 2023
So glad to hear that, Michelle! Happy baking!
Angela Wenger
June 7, 2023
I would like to use 100% fresh ground whole wheat flour. Can you help me with this recipe or suggest another?
Amanda Paa
June 7, 2023
Hi Angela! Here are some tips and recipe about baking with fresh milled flour for sourdough.
Bre
May 17, 2023
This has been my go-to recipe for many years! It always turns out perfectly! Thank you for sharing your wealth of knowledge!
Amanda Paa
May 17, 2023
oh, that’s so great to hear Bre! glad you are enjoying this recipe and that it is part of your baking routine.
Jessica Jo
April 9, 2023
I would love to try this recipe as the guide is so informative. What’s the hydration in this loaf?
Amanda Paa
April 9, 2023
Hello! This recipe has a 77% hydration.
Mary Woodward
April 4, 2023
I am new to sourdough and this is the 3rd recipe I have tried and it has been my favorite! The dough was not as wet as some of the previous recipes. The refrigerator proof enhanced the flavor as well. What size banneton do you use for your breads?
Amanda Paa
April 5, 2023
That’s wonderful to hear, Mary! I use a 8.5 inch round banneton, or a 10×6 oval banneton.
Lori
April 3, 2023
My first try with sourdough and it turned out great!! Will be using this recipe weekly :)
Do you know the nutritional information for this bread once prepared?
Thank you!
Amanda Paa
April 3, 2023
that’s great to hear, Lori! i do not have nutritional information for the bread, but i believe you can type “free nutritional calculator” into google and find programs that will do it for you.
Gail Martin
March 15, 2023
After years and years of hockey puck bread I final DID IT!
I read your recipe and watched your videos.
Convinced you were making it look easier than it really was.
10 hours later I had my loaf. I sent a photo to my 18-year-old daughter at work, and she said it looked amazing.
You don’t get a lot of compliments from an 18-year-old, so I cut up bread, drove the mile to her work and delivered it to her and her friends. They LOVED it!!
Before I got home, my phone blew up with photos of them enjoying their bread.
Thank you for a wonderful recipe and your videos!!
Cheers
Amanda Paa
March 16, 2023
So glad to hear this Gail! Sounds like you are on your way to baking lots of sourdough in the near future at the request of your daughter!
Diane
March 9, 2023
Hi -made this again today, but the crust didn’t get crunchy, it’s really soft. It’s a deep brown, so I didn’t want to leave it in the oven longer. Thoughts on what went wrong?
Andrea Hofer
April 23, 2026
Now that interest that you crust is not crunchy. I did open bake and my crust is crunchy. I hade a 3 quart dutch oven, will see how it is next time I bake. What size bo you have and water temperature did you bake,
Kathie
March 2, 2023
What size Dutch oven is best for one loaf?
Amanda Paa
March 2, 2023
Hi Kathie! You’ll want to use at least a 5 qt dutch oven.
Warren
February 16, 2023
Amanda, just found your Pinterest site….WOW! What a wonderful, straightforward & informative site. Thank you for sharing your knowledge & tips with all of us. Yes, bread baking in an ever evolving event, and as you say, not two loaves will ever be exactly the same. Thank you.
Amanda Paa
February 17, 2023
Thank you for the kind words, Warren!
Terri
February 14, 2023
Hi I thought your video was very well done. Your explanation was clear and concise. Thank you so much for making. I have 2 questions for you. 1) we live in a rural area so rely on a well which is softened by salt. Could that impact the health of my starter? I have a starter which has been fed twice daily for a couple weeks. Stil not quite doubling in a warm room. 2) you show in the video white winter wheat. That is a whole wheat flour but the recipe uses bread flour with a small amount of whole wheat. Thank you for the clarification.
Terri
Amanda Paa
February 15, 2023
Hi Terry! Yes, the salt will in your water inhibits yeasts and acid formation, therefore your starter will suffer and not rise. I only use filtered water to feed my starter. As for the flour, I feed my starter organic all-purpose flour, and the bread recipe itself uses bread flour and whole wheat.
tiffany brookes
February 12, 2023
I was confused on the timings you gave for letting your bread bulk Fremont in the fridge.
From the description above, I was under the impression you finish your four folds over two hours, then put it in the fridge to bulk Frement, then bring it out to shape it.
But reading the comments below it seems I mis understood. Bulk Frement on the counter for 6 hours , then shape it , then put in the fridge ? Is that right ?
Amanda Paa
February 12, 2023
yes, you bulk ferment on the counter. times are approximate, as the finish of bulk fermentation will depend on the temperature of water you used and the temperature in your home. it is best to go on signs from the dough, like nearly doubling in size, having a slightly domed top, seeing small bubbles on the sides of container, and maybe a few bubbles on top of dough.
Tara
February 8, 2023
Hi! Do you preheat the Dutch oven or do you put the dough in a cold ditch oven then put in oven?
Amanda Paa
February 8, 2023
Hello! You can really do either, and have great results. I find for beginners that a cold start is a bit easier because you aren’t working with the hot dutch oven. A preheated dutch oven will give you a slightly better rise, if proofing has been done correctly.
Ray
February 6, 2023
I made this with organic whole grain spelt flour and, in spite of making a couple of mistakes (trying my banneton without its cloth cover and not doing the final 430 degree bake), it turned out great.
Amanda Paa
February 6, 2023
Great! If you use rice flour to coat your banneton, it should work great without your cloth cover since rice flour is non-glutinous therefore will not stick to glutenous bread.
Ray`
February 10, 2023
I did use rice flour but evidently I didn’t get enough in the spaces between the rings. I will likely try without the cloth cover again but with more attention to the dusting. Thank you very much for your response!
Amanda Paa
February 10, 2023
Yes, that can certainly happen! You can be liberal with the dusting.
Diane
January 21, 2023
This was the first recipe I did after getting the starter from you. It was almost perfect!! I still have some things to learn, but you have made this so easy. I can’t wait to make more bread this year!
Amanda Paa
January 22, 2023
Yay, welcome to the sourdough world!
Carla
January 14, 2023
Rd
Tabetha
November 17, 2022
I love this! I’ve made it 4 times now and it’s a very forgiving and delicious recipe. I was wondering if I could double the recipe to make a huge loaf? And is there a good way to slice the bread? Between the crust and the very pillowy center, I find myself squishing the bread a lot to slice it.
Amanda Paa
November 17, 2022
Yes, you can double, but I would suggest splitting it into two loaves for handleability!And great question, here’s a video I filmed about the best way to cut sourdough bread.
Dawn
November 5, 2022
This is a wonderful recipe! I am having a difficult time with scheduling it, though, with so many steps. Do you have any rough baking schedules so I can see how this all fits into a day without setting alarms to get up at 3am to do a step? I’m having a hard time getting my starter to be ready at a time that ends up working for the bake time.
Amanda Paa
November 6, 2022
Sure! Here is a rough schedule, very much dependent on the temperature in your kitchen. (Cold kitchens, dough will taken longer to rise, warm kitchen, dough will rise faster.)
9am: Feed Starter
2ish pm: Mix dough, let rest for 30 minutes for autolyse.
2:30: Initial mix and first set of stretch and folds. Let rest 30 min.
3ish pm: 2nd set
3:30: 3rd set
4pm: 4th set, then it will go through the rest of its bulk fermentation on counter.
When it has risen about 70%, not quite double, and has a few bubbles on top, has somewhat domed on top, your bulk fermentation is complete, which should be in the evening around 9pm if your kitchen is about 70 degrees.
9pm ish: Shape your dough and put into banneton. Put into refrigerator with shower cap on top or inside a plastic bag so that it doesn’t dry out. Let it go through its final rise in fridge overnight.
Next morning: 9am ish: Bake bread.
Dawn
November 6, 2022
Thanks so much!! I will try it. I think my problem was I was leaving it on the counter overnight, and it was overproofing by the time I woke up the next day. I need to put it in the FRIDGE [face palm]! :)
Nancy
October 8, 2022
It worked out perfectly, I’ll keep working on it ( was only second time trying sourdough and first time with this recipe/method). I will definitely keep practicing with this recipe! Thank you for making it easy and understandable.
Leah
October 4, 2022
Could you lay out a baking schedule for an AM bake and a PM bake including the times of when you feed your starter (obviously the time will vary based on everyone’s room temperature and climate) but, it would be a super helpful guide!
Amanda Paa
November 6, 2022
Sure! Here is a rough schedule, very much dependent on the temperature in your kitchen. (Cold kitchens, dough will taken longer to rise, warm kitchen, dough will rise faster.)
9am: Feed Starter
2ish pm: Mix dough, let rest for 30 minutes for autolyse.
2:30: Initial mix and first set of stretch and folds. Let rest 30 min.
3ish pm: 2nd set
3:30: 3rd set
4pm: 4th set, then it will go through the rest of its bulk fermentation on counter.
When it has risen about 70%, not quite double, and has a few bubbles on top, has somewhat domed on top, your bulk fermentation is complete, which should be in the evening around 9pm if your kitchen is about 70 degrees.
9pm ish: Shape your dough and put into banneton. Put into refrigerator with shower cap on top or inside a plastic bag so that it doesn’t dry out. Let it go through its final rise in fridge overnight.
Next morning: 9am ish: Bake bread.
Rebecca
August 16, 2022
My dough was very wet. Is that because I used all white flour? I am comparing your single loaf recipe to others and it is quite different. I ordered proofing baskets from ChrisElite. Their recipe is 113g starter 241g water 284g white flour 57g whole wheat. I’m going to try theirs and compare.
Amanda Paa
August 16, 2022
Yes, this recipe is for using bread flour. All-purpose is not as strong, therefore will not absorb the amount of water called for in this recipe, leading to wet dough. If you only have all-purpose flour, you’ll want to use my All-Purpose Flour Sourdough Bread recipe.
Dawn
July 16, 2022
This is my first venture baking at a slightly higher hydration level-hope it works! In a funny twist that I hope doesn’t ruin things, I accidentally turned my dough out and shaped in POWDERED SUGAR instead of rice flour haha-we’ll see what happens-perhaps it will be the magical secret ingredient for the ages! Hope it turns out, at any rate! Thanks!
Sarah H
June 6, 2022
This is my favorite sourdough recipe ☺️
Amanda Paa
June 6, 2022
love to hear it, Sarah!
Laura Kelsey
May 31, 2022
I love with your site! I made your sourdough recipe today after using another recipe before. It is seriously the bomb! The crust is perfectly crispy but not too hard. I did add 4 ice cubes to my Dutch oven. I have had my starter for about 2 months, started from scratch. I am still having difficulty getting it to bulk ferment. It bubbles and gets shiny but does not get anywhere near doubling after 9 hours on the counter. Any advice? Or do you think it might be bc Doughrinda is still a little young.
Amanda Paa
June 2, 2022
Hi Laura! Are you using your starter when it’s at its peak to mix the dough? Are you using a scale to feed and discard your starter?
Laura
June 7, 2022
Yes to both. I am thinking I just need to really wait it out and go up to 16 hours and see what happens. My kitchen is about 77 degrees on the counter. The bread still tastes delicious. But I am not getting the rise that I see in other breads. Thank you for your help!
Amanda Paa
August 4, 2022
Hi Laura! At 77 degrees you are likely overproofing the dough during bulk fermentation, so it does not have enough gas left in it to rise properly when baked. With that warm of a temp in your kitchen, try shortening the bulk fermentation rise and catch it before it doubles.
Hannah Manning
August 4, 2022
Hi! I’m having the same problem. I’m using a scale and using it at its peak
Amanda Paa
August 4, 2022
Hi Hannah! You are likely overproofing on the bulk fermentation, which can easily happen during summer when our kitchens run warm. Try and catch the dough a little bit before it doubles rather than waiting until it has fully doubled, and move on to shaping.
Karen Gonfiantini
April 25, 2022
After full fermenting I shaped and put dough in banneton. It was late so I chose to do final rise in fridge overnight. I just covered with towel but didn’t know I was supposed to wrap in plastic bag to keep air out. Hoping this misstep doesn’t ruin my end result. Is towel covering enough? Enjoy your videos. Thanks!
Amanda Paa
April 27, 2022
Hi Karen! A plastic bag is best to avoid the top drying out. If you have to use a cloth, it should be quite damp. Hope it turned out okay!
Karen Gonfiantini
April 27, 2022
It did! My first successful sourdough loaf! Thanks for the great tips.
Julie Dowling
April 19, 2022
Have tried your loaf a number of times. It always comes out great however it does not stay in a lovely boule shape like yours does. I read that it is overproofing but I don’t think that is what I am doing. I live in New Zealand and I am wondering if our flour is different to the American. Thanks for your excellent videos
.
Amanda Paa
April 20, 2022
Hi Julie! Yes, different countries have different wheat varieties that make up their bread flour, and I’m guessing that yours is not as strong (the protein percentage is less) as the brand we use here in the U.S. Which makes sense that your bread would not hold it’s shape as well, because lower protein flours cannot absorb as much water as say bread flour. Try making my all-purpose flour sourdough with the flour you have in New Zealand, and that should fix things for you!
Jo Fernandez
April 5, 2022
Perfect Sourdough bread! Thank you! It was my first time to make sourdough from starter. I was really happy woth the results and my family loved it!
Amanda Paa
April 5, 2022
So happy to hear, that Jo!
Lynn Shwadchuck
March 27, 2022
Wow, this is my second loaf from your site (rustic rye first). Fantastic crust, chewy, holey bread and – big surprise – not sour. I’ve been warming to the sour taste, but I’m happy with this. I’ll be making it again.
Wendy
March 19, 2022
Can you add any seeds to this recipe and if so, when would you add them ?
Amanda Paa
March 19, 2022
Hi Wendy! I have a Seeded Sourdough Bread recipe that sounds like what you are wanting to make!
Kim
March 8, 2022
I have a question for you! After the dough has done its bulk fermenting and I shape the dough and put it in the banneton – do I put a damp towel over the banneton and then wrap it in a bag if I am going to do the final rise in the refrigerator? It seems like the cloth lining would get damp? Thank you for your help!
Amanda Paa
March 8, 2022
Hi! If you are doing the final rise in the fridge, you don’t need the damp cloth – you can put the banneton with dough in a plastic shopping bag and make sure it’s closed to not let air in.
Alla Bern
February 26, 2022
This recipe looks amazing. Can I use all purpose flour instead of bread flour since I don’t have bread flour at home.
Amanda Paa
February 27, 2022
hello! you’ll want to use this all purpose flour sourdough bread recipe if you don’t have any bread flour.
Merrin
February 19, 2022
This is fabulous, thank you so much! This recipe is beautifully simple & easy to follow, but I actually messed up & put my dough in the fridge before the bulk rise, overnight, but I let it rest/rise at room temp the next day & it still came out wonderfully! Crispy crust & chewy bread that reminded me of a bakery I hadn’t been to since I was a child. Can’t wait to do it right next time!
^_^
Amanda Paa
February 19, 2022
i’m so glad this bread gave you a bit of nostalgia!