Rustic Rye Sourdough Bread Recipe
By Amanda Paa – Updated October 31, 2023
Jump to Recipe
This post may contain affiliate links. Please read my disclosure policy.
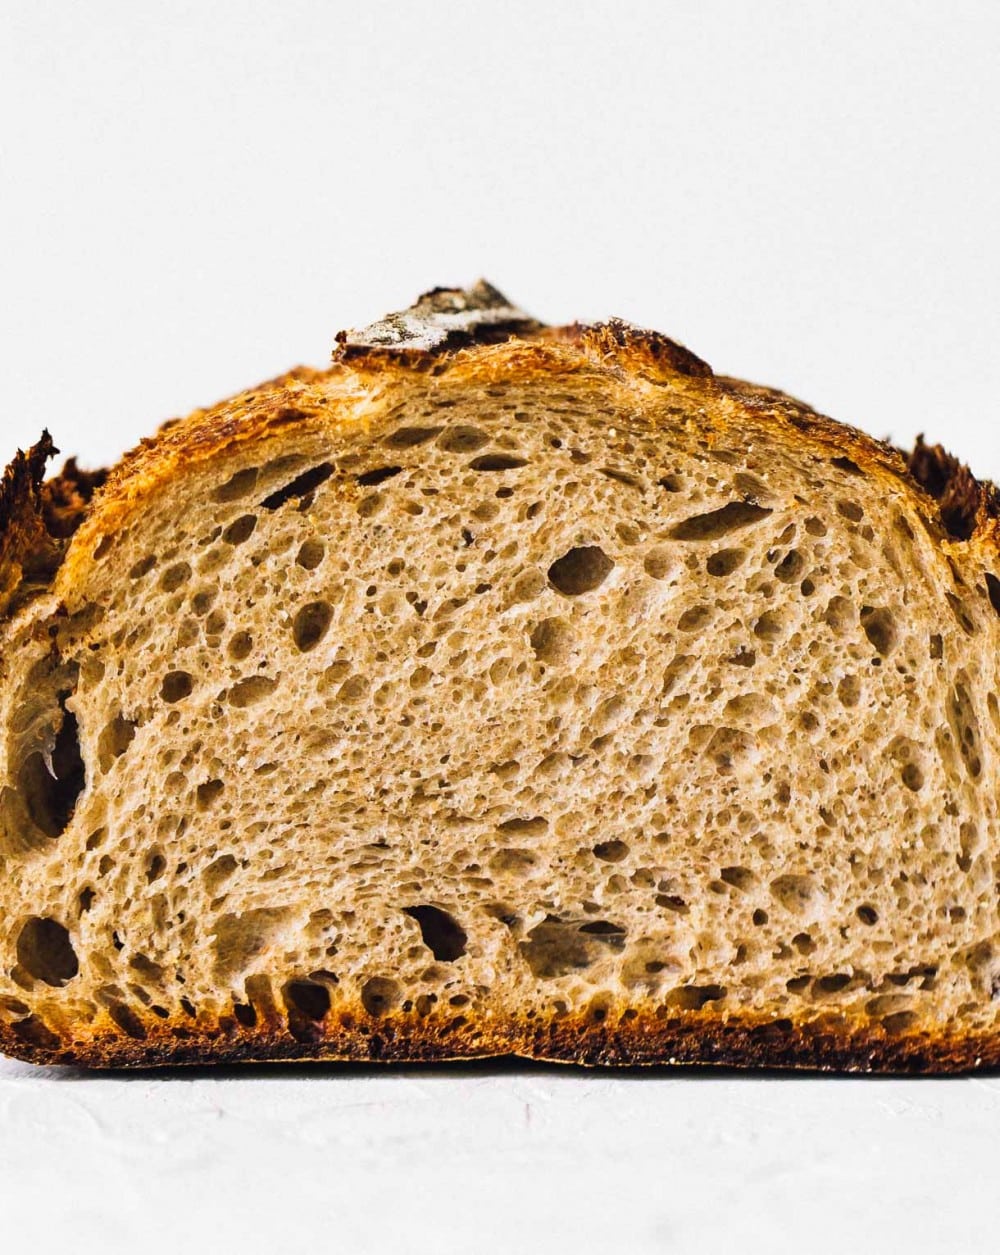
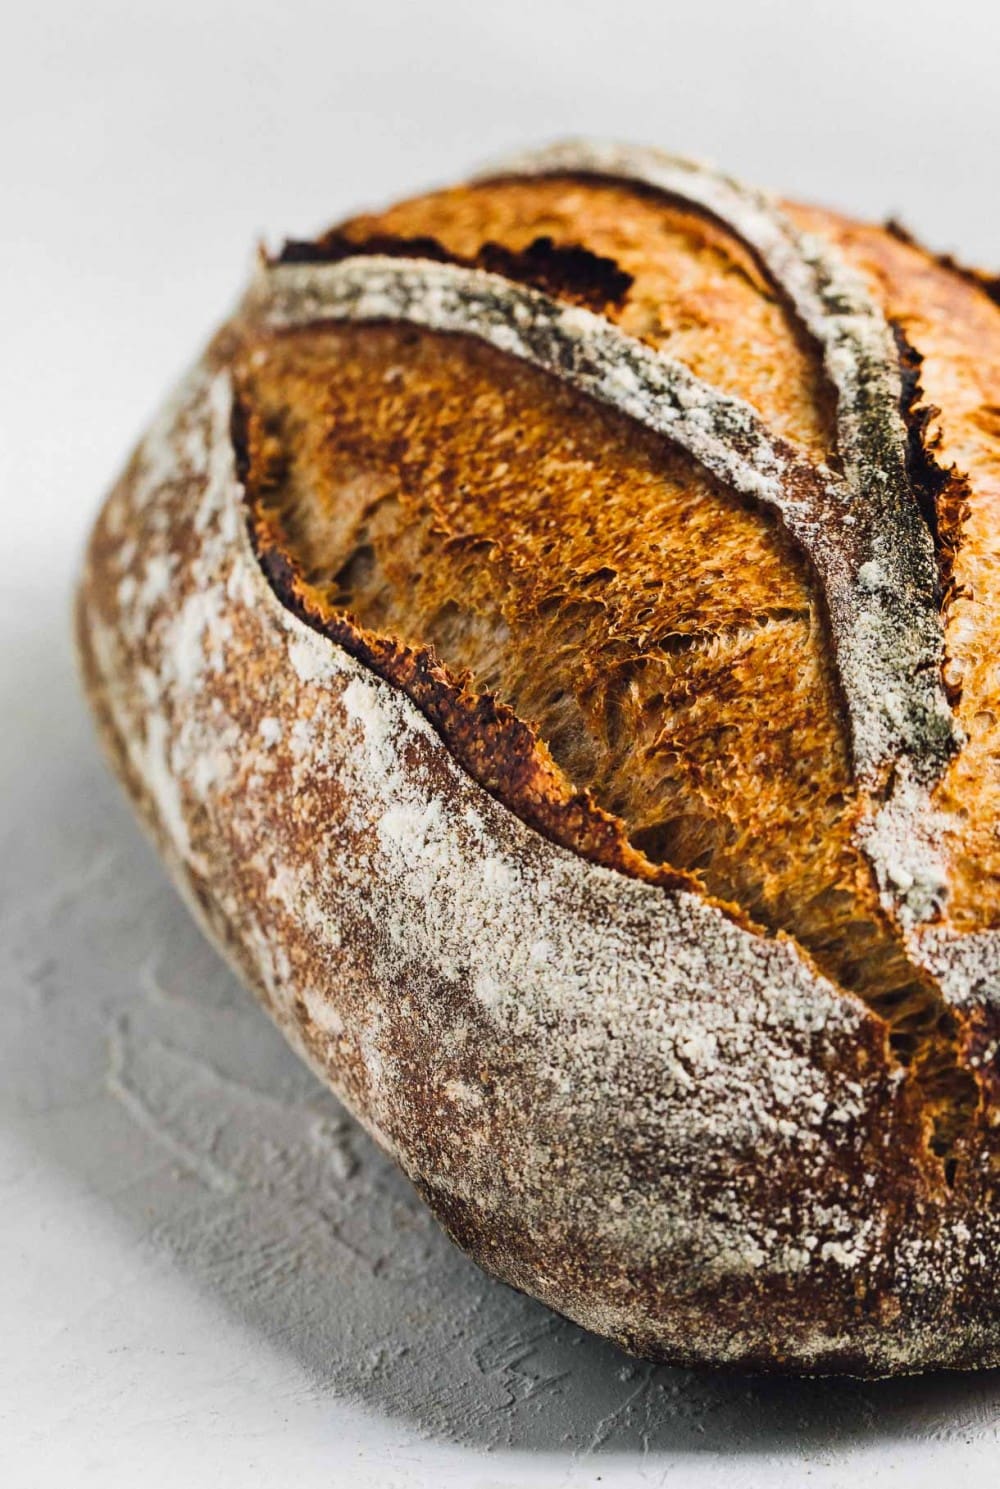
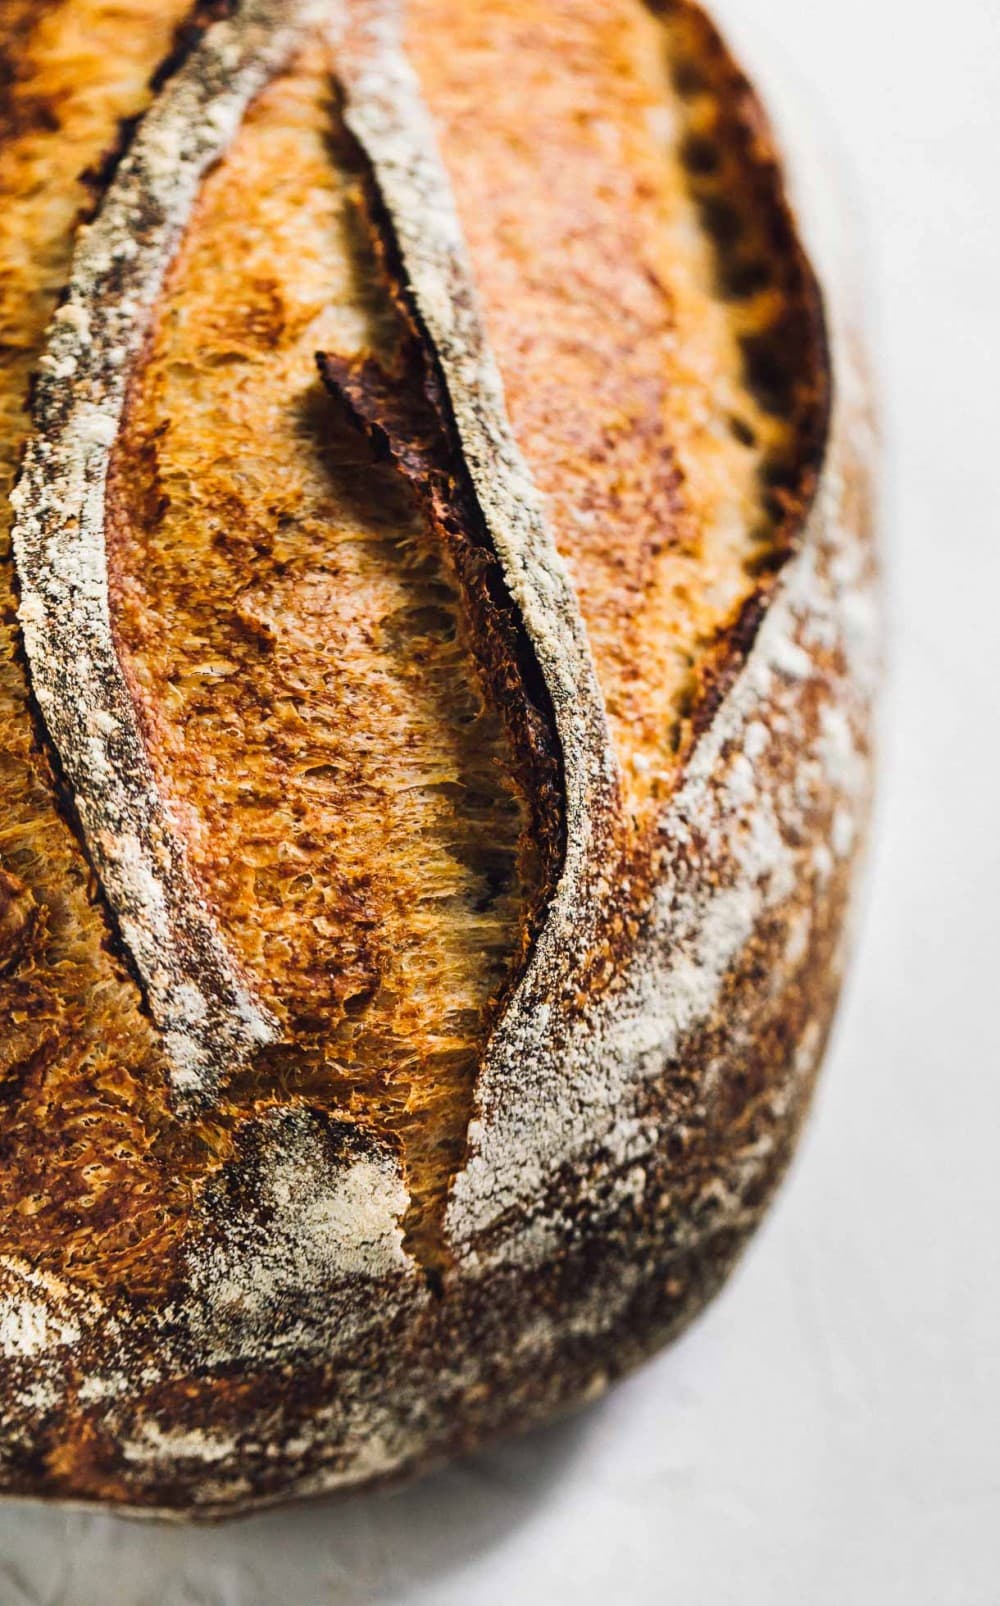
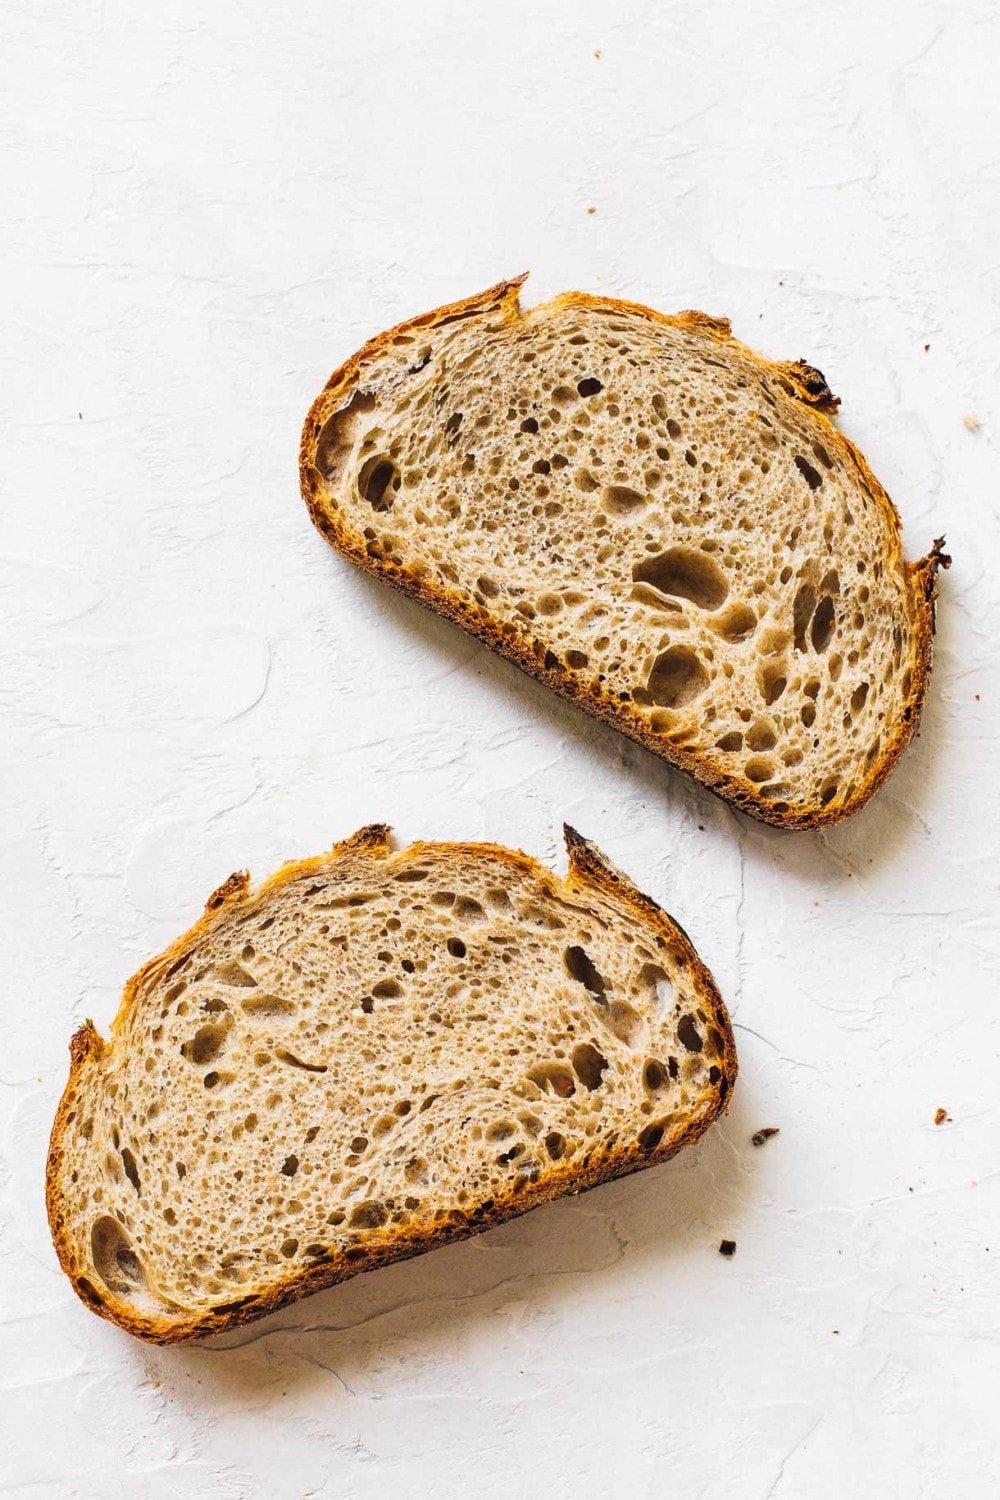
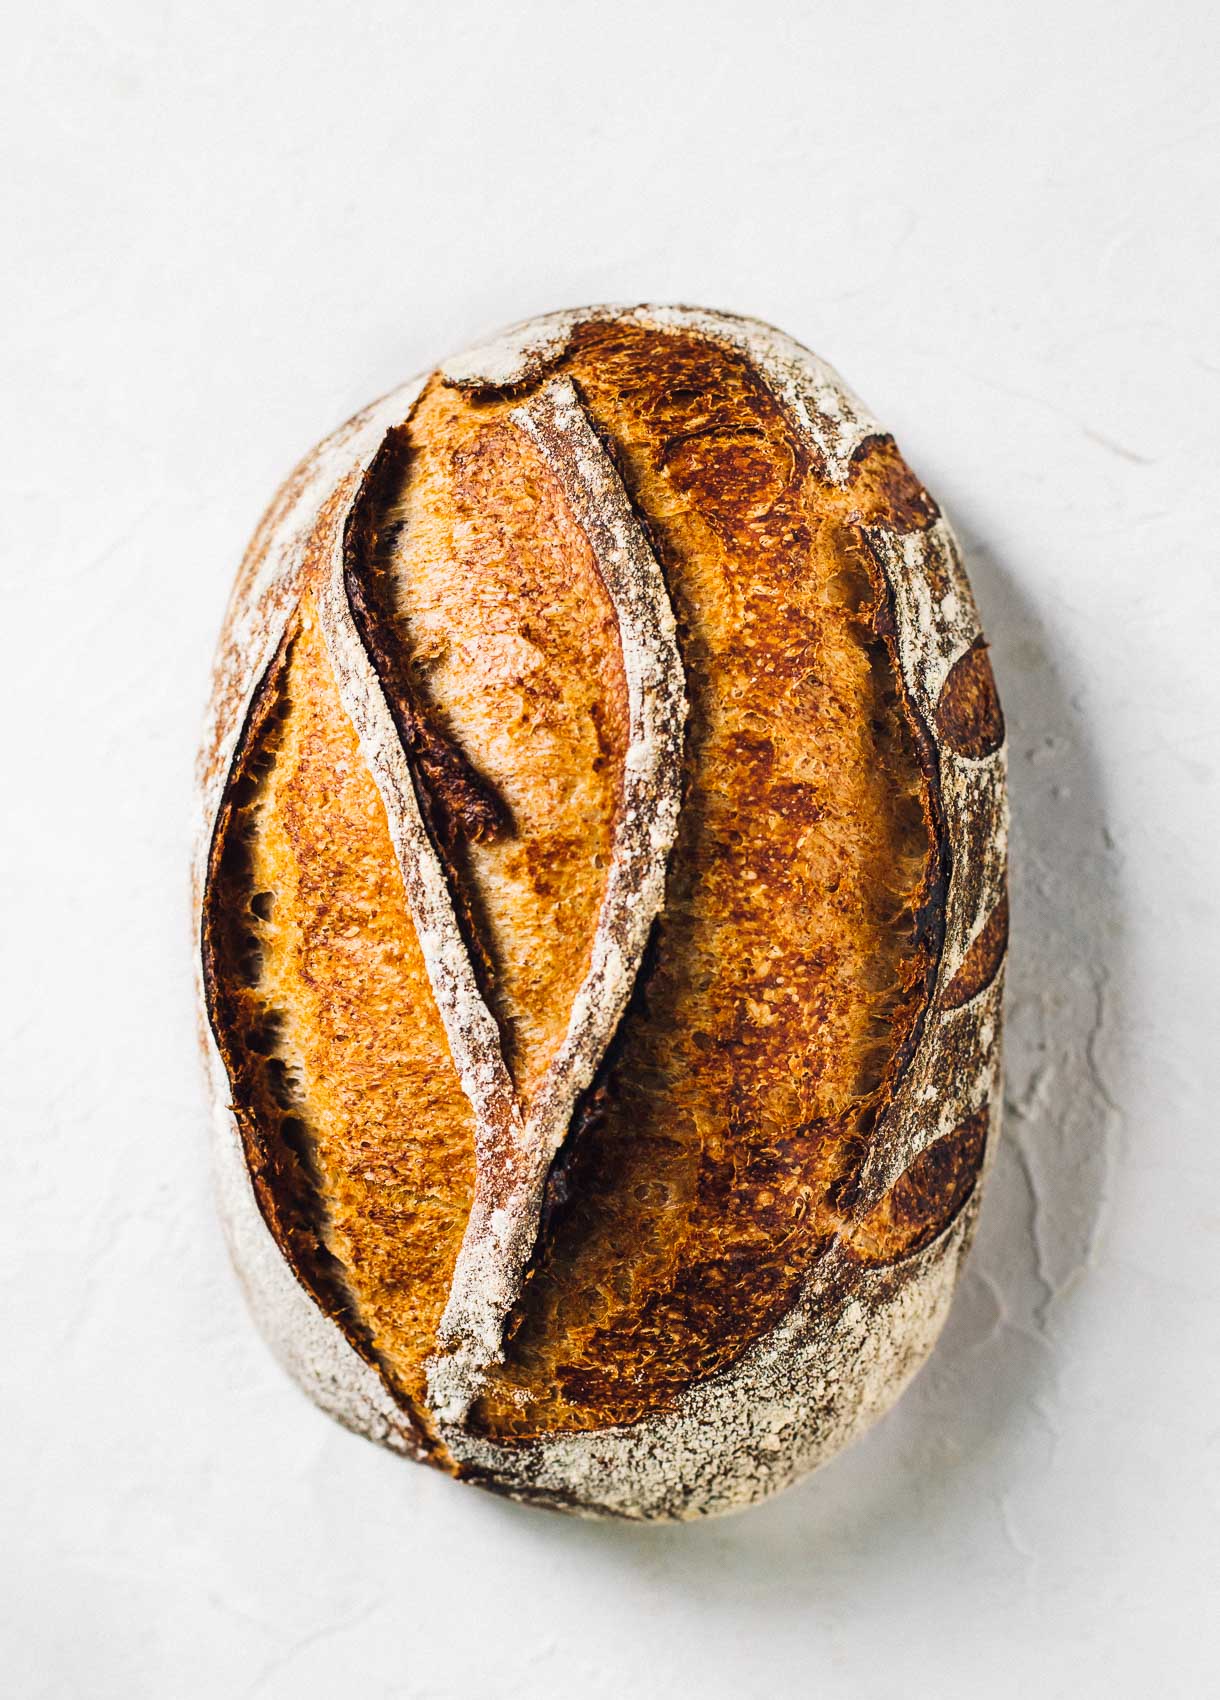
Homemade rye sourdough bread is a glorious choice for sandwiches, or eating on its own. Made with a blend of whole wheat, bread flour, and rye flour, this naturally fermented loaf holds its shape and has a moist, chewy crumb. The rustic crust is deeply colored and boasts beautiful blisters!

New to sourdough baking? You’ll need an active sourdough starter! I ship my well-maintened 13+ year old starter to anyone in the U.S! You can ORDER it here.
A great deli has a great rye bread for sandwiches, am I right?
I certainly love my Everyday Sourdough recipe for toast and my sourdough english muffins for epic breakfast sandwiches, but I had my heart set on creating a loaf that was the perfect vehicle for my recent craving of EGG SALAD. I’m fully aware how strange this craving is, but let me tell you, when I piled it on this rye sourdough with crisp lettuce and pickled red onions – it was a joyful moment.
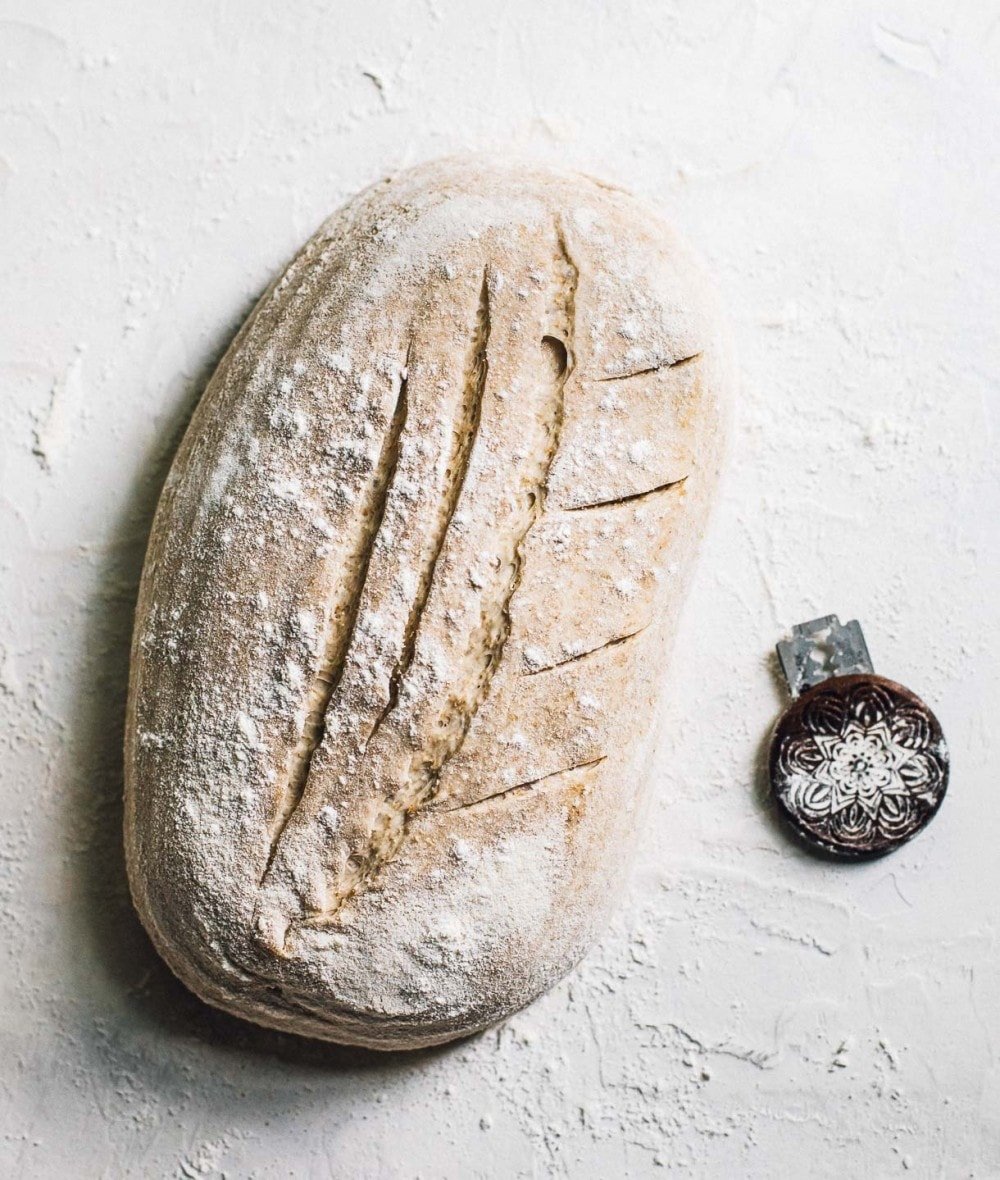
This rustic rye sourdough is called such because of its crisp, deeply browned crust and artisan sourdough shape, rather than baking it in a pullman loaf pan to get perfectly square slices for sandwiches. I might invest in one of those in the future, but for now, I wanted to share a sandwich bread recipe that you could make with your regular sourdough baking tools.
It’s hearty. Has substance. A pleasant tang. And a shatteringly crisp crust.
What is rye?
Rye is a type of grain, different than wheat, that contains a low amount of gluten. This means it will not create the same gas trapping air pockets that a bread made entirely of bread flour does.
The dough will also feel wetter and stickier compared to working with all purpose and bread flours, known as high gluten flours. Don’t be alarmed – the dough will become less sticky by the end of your stretch and folds. Knowing this before making this recipe is important.
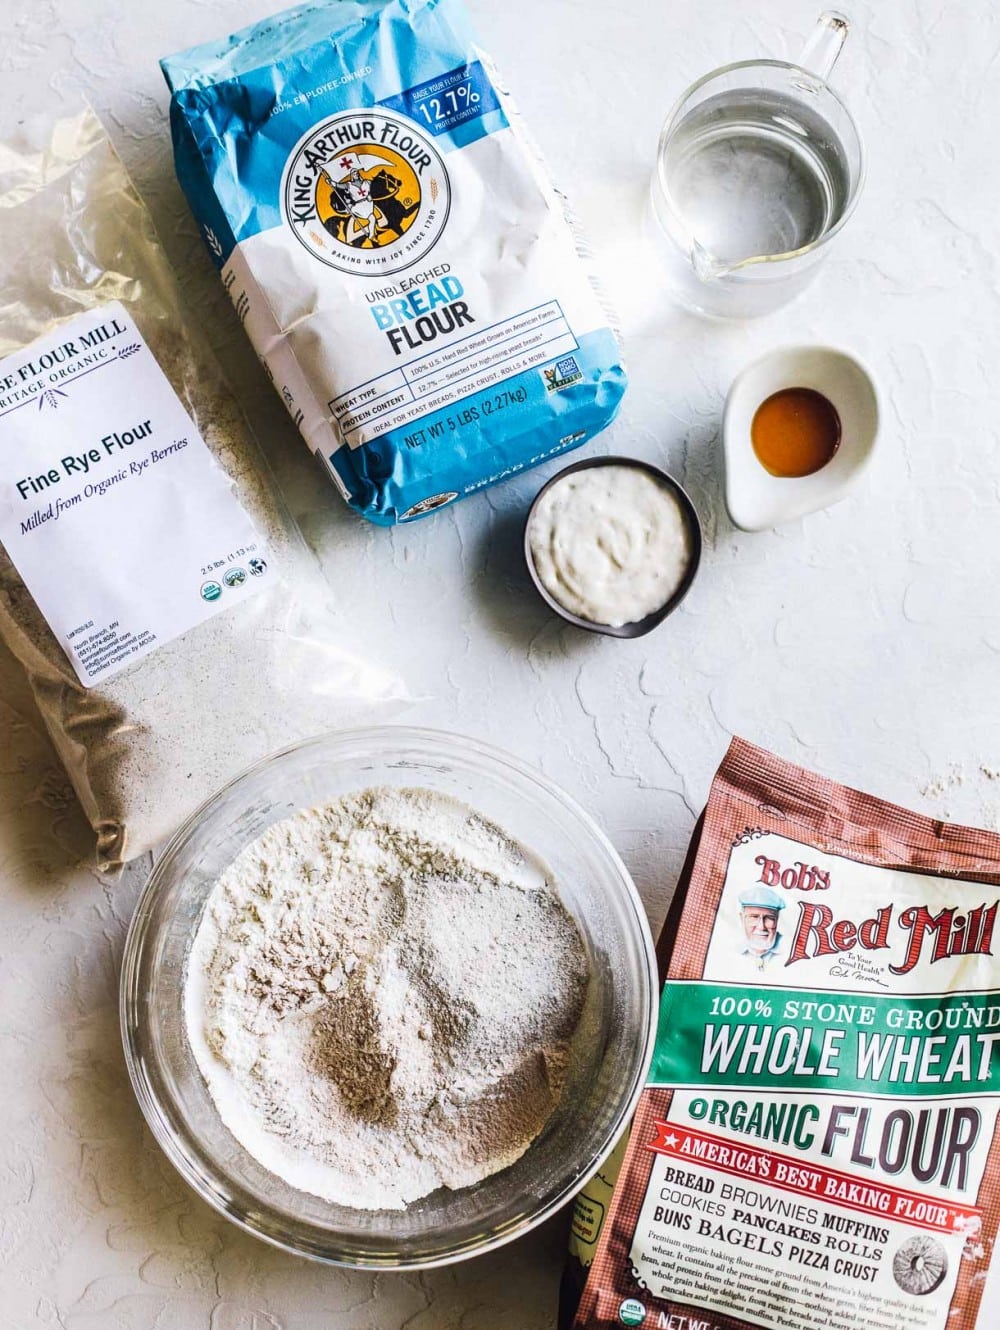
For these reasons, I like to use rye in combination with bread flour, for a balance of high/low gluten percentages. This allows for excellent structure in the loaf, while the rye contributes a complex flavor and wonderful softness.
Why I love using rye flour in sourdough bread
- Complex flavor!
- Rye flour bodes particularly well to sourdough as it’s unique fruity, subtle sourness compliments the traditional notes of fermented bread.
- Less dense than traditional rye bread.
- Because of the chemical reaction that takes places in rye flour during fermentation, your loaf will be airier and fluffier than if you were to use rye flour in a bread made with commercial yeast.
- Bread has a moist, chewy texture that you can’t achieve with whole wheat.
- Because of rye’s ability to absorb and keep much of it’s moisture, the inside of a sourdough loaf made with rye flour will have a more moist texture.
- Your loaf will stay soft for several days after baking!
- Higher nutritional profile that whole wheat.
- Rye contains more nutrition than wheat flour does, and this is especially true when rye flour is added to sourdough bread. The slow fermentation increases the nutrient availability of the flour.
How to make rye sourdough bread that holds its shape
Because rye flour has little to no gluten content, it’s difficult to make a loaf of 100% rye bread. It can be done, but I wanted this to be a hybrid loaf, that would hold it’s shape for you, and still achieve a nice rise.
That’s why I used bread flour in combination with the rye and whole wheat, because it’s higher protein percentage is the key to the loaf holding its shape.
You’ll also notice this is a slightly smaller loaf, which makes the slightly wetter dough more manageable. Yes, you’ll notice the dough is slightly wetter than other sourdough bread you’ve made, and that’s okay! Just keep going with it. It will bake up with great structure if properly fermented.
WATCH this short video to see all the steps of making rye sourdough, so you know what to expect from your dough.
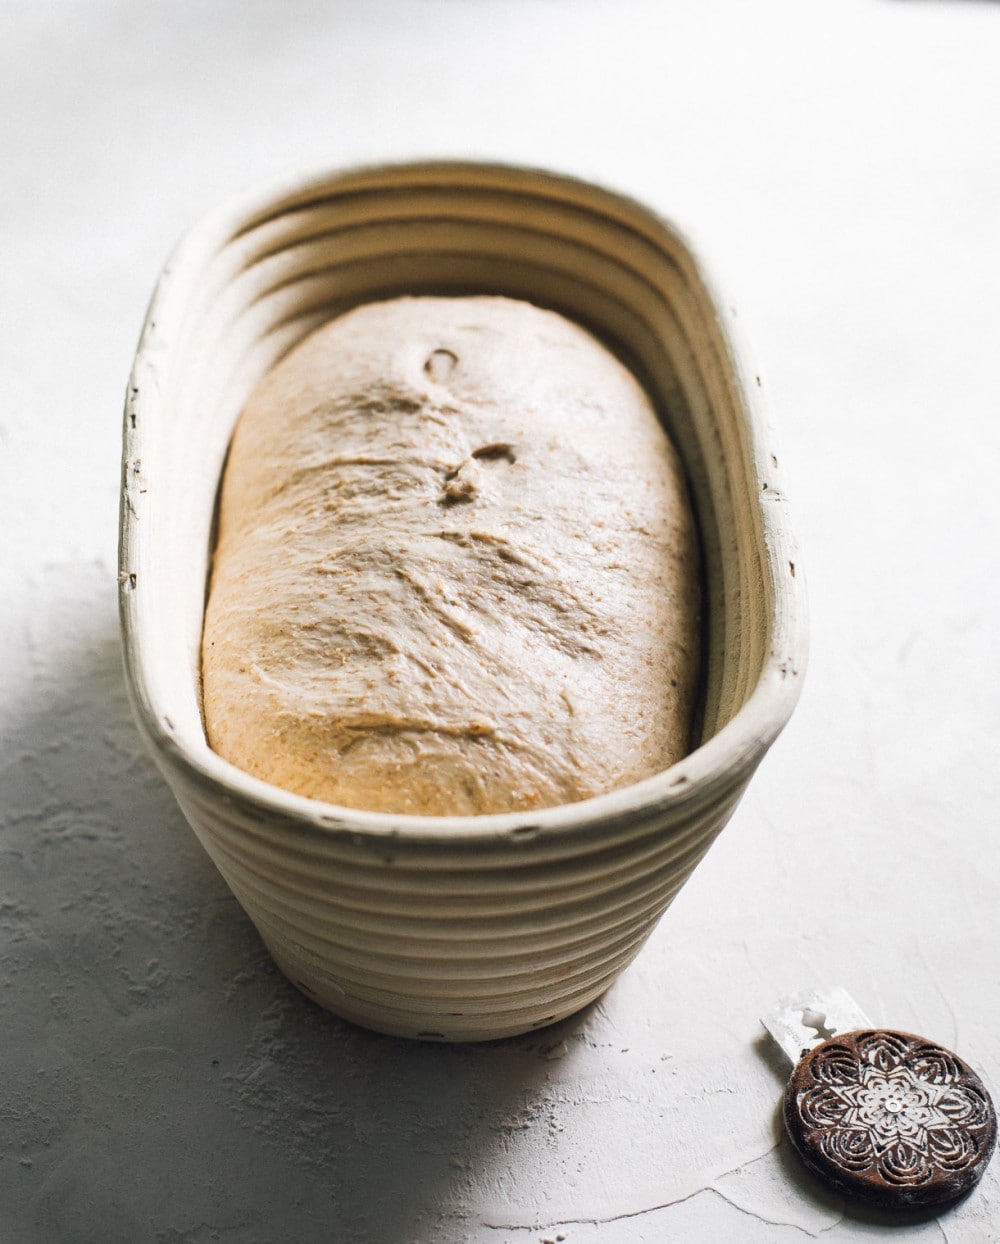
What should I bake an oval loaf in?
I tried using my round dutch oven for baking oval loaves in the past, but without fail the edges of the dough with hit the side of the pot, creating wonky, bulged shapes. I’m newly in love with the Challenger Bread Pan, which has a unique shape that allows you to bake any shape of bread in it! Bâtards, boules, demi-baguettes, and other loaves of almost any size.
Because of how it’s made, the perfect amount of steam is created inside the pan. I’ve never had better oven spring or thinner crusts.
This pan is magical. If you love baking sourdough, it is 100% worth having in your kitchen. You can learn more and purchase here.
My favorite things to eat on rye bread:
- egg salad
- whipped feta and tomato jam
- smashed avocado + lemon + smoked paprika
- ricotta + strawberry rhubarb jam
- salted butter
More sourdough recipes:
Yield: 1 loaf
Equipment
- oval banneton (can also use round)
Ingredients
- 55 grams active sourdough starter
- 280 grams slightly warmer than room temperature water (about 80-85 degrees F)
- 15 grams honey
- 100 grams medium (or light) rye flour
- 260 grams bread flour
- 40 grams whole wheat flour
- 7 grams fine sea salt
Instructions
- Before beginning, it will be helpful to watch this SHORT VIDEO to see me make this bread, noticing that the dough will be stickier than normal because of the rye flour, but it will come together – you just have to trust!
- Add starter, water, and honey to a bowl. Whisk thoroughly until combined, with a fork. Add flours, and mix together first with the fork to start to incorporate, then with your hands until a shaggy dough is formed, and the bits of flour left just disappear. Sprinkle the salt on top and do not mix in, just leave it on top. Cover with a damp cloth.
- Autolyse: let dough sit for one hour, covered and undisturbed.
- Bulk ferment: Now you will knead the salt that is sitting on top, into the dough for about 2 1/2 minutes. There is no precise way to do this, just think of working the dough through your hands and up against the bowl, push and pull. You will start to feel the dough relax a bit around 1 minute. Then leave the dough alone, covered, for 30 minutes. This counts as your first set of stretch and folds.
- After those 30 minutes pass, perform a set of stretch and folds. Repeat 2 more times.
- Now you will let sit, undisturbed and covered with a damp cloth, for the remainder of its bulk fermentation. You will know it is finished with its bulk ferment when the dough has risen about 75% (just short of doubling) in size, is smooth and puffy on top, with a few bubbles around the edges. It will not be as jiggly as some sourdough you've made before. I find this takes between 5-7 hours, depending on the temperature of your home. If the temperature in your home is above 72 degrees, this will be on the lower end; if it is cooler it will take on the longer end. Always go by the look and feel of your dough to know when it is finished proofing rather than time.
- When finished with bulk fermentation, lightly dust your work surface with flour. Put dough onto the work surface, and pre-shape. Then let sit for 15 minutes on your work surface.
- Then shape your dough using the video attached here as a guide.
- Place dough into your flour dusted banneton, (or flour dusted linen lined banneton) seam side up. (Optional, you can wait 15 minutes after placing it in banneton, and pinch the perimeters of the dough into the center to hold the shape even more, called stitching.) The dough will now go through its final rise. You can do this on the counter, which will take about 1 1/2 to 2 hours at 70 degrees F for the dough to puff up and be jiggly. It will not double. OR you can do the final rise overnight in the refrigerator, with the banneton covered in a plastic bag or with a very damp cloth. You need this for holding moisture in.
- Time to bake. Preheat your oven to 475 degrees F, with your dutch oven preheating inside the oven. When the oven is preheated, flip your dough out gently onto parchment paper and score your dough. If you did the final rise in the refrigerator, take it straight from fridge to scoring. You should score it cold, and DO NOT need to let it come to room temp.
- Then put scored dough into the dutch oven on the parchment, and put cover on. Turn oven down to 450 degrees F and slide dutch oven in. Bake for 20 minutes, then remove cover.
- Turn heat down to 430 degrees F, and bake for 20 to 25 more minutes, until crust is golden brown and crackly. Remove from oven, and remove bread from dutch oven and place onto a cooling rack.
- Wait AT LEAST one hour to cool otherwise, the interior will be gummy.
Did you make this?
tag @heartbeetkitchen on instagram and hashtag it #heartbeetkitchen
June 12, 2020
Katie
April 7, 2026
Perfect! I added caraway seeds. Absolutely wonderful bread.
Amanda Paa
April 7, 2026
Thanks for making the recipe!
Kathleen
April 5, 2026
OMG so good!!!! I’ve made numerous different rye sourdough loaves and this recipe is by far the best. Crispy crust and dense moist interior in the best way possible. And it has a great rye flavor. I did add caraway seeds. This was the perfect accompaniment to Easter dinner. Looking forward to having ham sandwiches with the rest of the loaf. We had a lovely dinner with lots of good food, but my husband just ranted about the bread. Thanks for sharing this recipe.
Amanda Paa
April 5, 2026
Such a joy to hear this! Thank you for making the recipe!
Christy Guevarra
April 3, 2026
Hello. Can I use AP flour instead of bread flour?
Lynn Jackson
April 1, 2026
Very tasty and easy to make. Makes delicious toast!
Simone Ribanic
March 31, 2026
I made your recipe the other day. It was amazing, reminded me of German bread! I was wondering if the baking time will change if I double the recipe and make 1 big loaf. Bread was gone in a heartbeat it was so good
Amanda Paa
April 1, 2026
Makes my day to hear that! Bake time should not change much for doubling, I would maybe add 5 minutes to the end of baking. You can always check internal temp of bread too – it is done at 205 degrees F.
Carole
March 29, 2026
Great recipe! We love the flavor, especially when caraway seeds are included. Definitely a keeper. Made it with Sunrise Mills ancient grains flour because it has low gluten content.
Tish Rubin
March 22, 2026
Can I cook this in a normal loaf pan to use for sandwiches? I’d rather not use the cast iron Dutch oven if I don’t have to. If I can do you know at what temp and for how long? Thanks so much!!
Amanda Paa
March 22, 2026
Hello there! I haven’t tested that, sorry! Let me know if you do.
Joseph Wasser
March 22, 2026
This bread is the bomb!! I also added 1 Tbs. caraway seed that I ran through a spice grinder, and another Tbs. of whole caraway seed because my wife and I love that robust hearty flavor! I would also ask what the science is behind leaving the salt atop the dough during autolyse.
Thanks for the recipe!!
Taryn Stevenson
March 21, 2026
Hi…I am new to sourdough but your recipes are the best ones I have tried yet. Can you bake this in a bread pan or does it have to be in a Dutch oven?
Amanda Paa
March 22, 2026
Hello there! So glad you’ve had success. I haven’t tested this in a loaf pan, sorry! Let me know if you do.
Monica
March 20, 2026
The loaf turned out well and has the great rye aroma. I added in 2 teaspoons of caraway seeds. I’ll be serving it to family tonight. The loaf is small so I’ll need to slice it thinly. Perhaps the size is because of the lower gluten of the rye.
James
March 13, 2026
Is there a reason you don’t scale the rye?
I’ve made this once before turned out great. I used dark rye flour. The loaf didn’t last more than a day. Today I used AI to bump the recipe up to a 500 gram flour loaf. I use maple syrup in place of honey and I scaled the rye today, so we will see how it turns out.
Dawn
March 12, 2026
Can you use dark rye flour?
Cassie
April 10, 2026
I did, and I think it turned out ok! I haven’t tasted it yet, but it looks like a normal loaf
Teresa Bennett
March 10, 2026
This Rye Bread was absolutely wonderful. I MEAN IT!
I had left over Prime Rib Roast.
Made a aju and had French Dips.
The Best thing ever.
Thanks for your recipe and my 1st
Loaf of Rye Bread.
Amanda Paa
March 10, 2026
Yay, so happy to hear your joy!
Eric
March 2, 2026
I love your recipe! It reliably produces boules or batards or fits in a bread pan and creates just the right density and crumb for both sandwiches and artisan hunk-munching! I scaled up to 1kg to make two
loaves and sometimes add caraway seeds.
Amanda Paa
March 4, 2026
Love to hear it!
Pamela
March 2, 2026
I baked this morning. Turned out perfect and tastes so good. I added inclusion of caraway seeds. Thank you for the recipe. I would include pictures but I don’t see where to upload.
Amanda Paa
March 2, 2026
So glad you enjoyed it! And great twist to add the caraway seeds. I wish I had a function to upload photos, sorry!
Carole
March 29, 2026
Great recipe! We love the flavor, especially when caraway seeds are included. Definitely a keeper. Made it with Sunrise Mills ancient grains flour because it has low gluten content.
Rachel Desjardins
February 26, 2026
I love this recipe. I am using six different types of flour in it. I double the recipe so that I have two loaves and I freeze one loaf. We just love it so hearty so healthy and easy to make. Thank you for your recipe.
Kristine Smith
February 19, 2026
I love this bread and make a loaf every week. Thanks so much!
Amanda Paa
February 19, 2026
So glad you like it! ❤️
Michele Durnin
February 17, 2026
Best bread ever. Can it be made in a loaf pan? Need to figure out how to make it bigger. Didn’t last long in my house
Michele Durnin
February 15, 2026
Can I cover it with a plastic bowl cover instead of a damp towel?
Amanda Paa
February 15, 2026
Yes, that’s great! It will keep it from drying out.
Michele Durnin
February 16, 2026
Can I send pics of my loaf?
Debbie Clarke
February 15, 2026
Hi Amanda, Would it be ok to freeze this dough? If so, after the overnight ferment in the fridge? How would I defrost and cook from frozen. Thank you.
Amanda Paa
February 15, 2026
Hi Debbie! Wild yeast doesn’t do well in the freezer. I would recommend baking the loaf, then freezing it whole wrapped in foil and then a plastic bag.
Debbie Clarke
February 15, 2026
Thank you Amanda. Great recipe x
Welshgirl
February 10, 2026
Delish next I will add some rye seed
Monika
February 8, 2026
We love it!!
Suzanne VanWormer
February 3, 2026
My new go-to loaf!!!
Gai McCaffrey
February 2, 2026
Hi, I am wondering if its possible to tell me the calories and other nutritional values for 1 piece of rye sourdough. Thanks you
Kate
February 13, 2026
I was wondering about the same thing! Used online calculator and this is what I got (for one whole bread).
Calories 1457
% Daily Value*
Total Fat 6.7g 9%
Saturated Fat 0.7g 4%
Cholesterol 0mg 0%
Sodium 2982mg 130%
Total Carbohydrate 306.7g 112%
Dietary Fiber 30.8g 110%
Total Sugars 16g
Protein 46g
Vitamin D 0mcg 0%
Calcium 116mg 9%
Iron 20mg 113%
Potassium 1016mg 22%
Dolly Hallaran
January 26, 2026
Delicious flavor. I did not get an airy loaf. My starter is strong but I wasn’t sure when preferment period was complete. 8 hours must have been too long
Sarah
March 15, 2026
Probably as rye ferments really fast, especially with added sugar (honey).
Leah Messenger
January 25, 2026
Excellent recipe! Thanks for sharing
Amanda Paa
January 25, 2026
Glad you enjoyed it!
Beve
January 20, 2026
Can I use a cold oven start for this recipe? That is my preference.
Renee
January 18, 2026
Fluffy perfectly fermented loaf I am so pleased I found this recipe and I did end up getting the same rye flour and it was perfect. I plan to do caraway with the next loaf.
Marlaina Capes
January 12, 2026
I love this rustic bread. It’s the perfect blend of sour dough flavor with a hearty texture. I can’t stop eating it! Can this be made to be a larger loaf by increasing all ingredients by 20%? Are there other modifications? It’s my new favorite recipe!
Gene Prudhon
January 4, 2026
I’ve grown to rely on a thermometer. To what temperature should the rye loaf be baked? 190?
Amanda Paa
January 4, 2026
Hello! I aim for 200 degrees F.
Joanna
January 1, 2026
Can you add caraway seeds to this? If so, how much would you add and at what point? Thanks!
Amanda Paa
January 1, 2026
Hello! You definitely can; I usually start with 1 1/2 tablespoons of caraway seeds and fold in on the 2nd set of stretch and folds.
Sharon
December 30, 2025
Can you use dark rye to make this bread?
Sandra Prosen
December 28, 2025
This is a great recipe and the sourdough rye bread came out perfect! Easy to follow! Great flavor! Thank you so much.
Amanda Paa
December 29, 2025
So great to hear!
Natalie
December 7, 2025
This is a great recipe and the bread comes out decent but when I take mine out of the fridge it is so flat and doesn’t hold and shape. Any ideas what could be going on here?
Amanda Paa
December 9, 2025
Hi Natalie! That means it has been overproofed. This happens during the bulk fermentation period.
Lori
November 25, 2025
I am waiting for my dough to finish BF and plan on using a loaf pan. Any luck as a sandwich loaf?
Ilana
November 21, 2025
I made this. I used full grain Rye. I foegot to shape before it went into fridge but the bowl sort of did the job. I am gf but my family loved it
AD
November 15, 2025
Hi I want to make this into a sandwich loaf – what do you recommend for temperature adjustment for baking it in a loaf pan? Thanks!
Lindsey
January 9, 2026
I always make this as sandwich loaf. It is perfection. I bake 450°F with another loaf pan on top for first 20 minutes and remove top pan , add some ice to oven floor, and bake another 20 minutes or until 204°F. It is softer than most sourdoughs but perfect for sandwiches or topped with honey.
Amanda Paa
January 9, 2026
Oh, I will have to try that!
J8
November 14, 2025
Love this recipe. I’ve increased the amounts by half to make a larger loaf. Most recent iteration I added chopped apricots, chopped walnuts, some raw sugar and orange rind. Turned into a really lovely fruit loaf for breakfast toast.
Marjorie Eskay-Auerbach
November 11, 2025
Hi Amanda- I could not find light rye and have used medium instead, it works well and have added caraway seeds which make it smell and taste more like the traditional east coast rye I grew up with. Your bread has been a BIG hit – first bread I ever made, and the only recipe I have used for years now!
Kendell
November 10, 2025
When can I add the caraway seeds?
Amanda Paa
November 10, 2025
Hi! I usually add during the 2nd set of stretch and folds.
Kendell
November 10, 2025
Awesome, thanks just mixed the dough and waiting for my first stretch and fold
Madyson
November 26, 2025
How much do you add? I cannot find it on the recipe.
Amanda Paa
November 26, 2025
I usually use 1 to 2 tablespoons, depending on how strong you want the caraway flavor to be.
Jane
November 6, 2025
Tonight was the fourth time that I have made this excellent and flavorful rye bread. The first three times, I gave it the overnight rest in the fridge, and I had to skip that this time and just let it rise at room temperature in the banneton. I will never skip the overnight chilled rest again. The cold loaf is much easier to score, and holds its shape far better. This time, the scoring wasn’t as defined, and the loaf spread out a bit when taken from the banneton. For best results, I would say that the overnight rise is a game changer. Well written recipe, by the way: its very easy to follow!
Tania Short
November 2, 2025
When you say, OR you can put it in the fridge overnight for the last rise, does that mean you can cook it straight from the fridge? Thanks
Amanda Paa
November 2, 2025
Yes, it should go straight from fridge to scoring to oven. It should not sit on counter to warm up.
Jill Y
October 29, 2025
Great and easy to follow!! This turned out really nice!! First time baking this. Will definitely bake again but cold ferment overnight so I can score it better.
Anonymous
October 26, 2025
Made this using Bob’s Red Mill Artisan Bread Flour. I didn’t have any fine rye flour, so I used Bob’s Red Mill Dark Rye flour. Excellent flavor. Thanks for the recipe!
Megan
October 23, 2025
I love this recipe so much. It’s a special flavor that feels elevated and I’ve been making it to give as gifts. I always get rave reviews! I love the process of adding the salt on top and then folding it in after a hour. Yes the dough stays sticky but it bakes up beautifully. I try to copy your scoring pattern too.
J8
October 21, 2025
Very yummy. I’ll be making this again. Smallish loaf but lovely flavor.
Doris
October 20, 2025
I have made this recipe several times and it is a great recipe! Delicious results. Try it!
Amanda Paa
October 20, 2025
So glad you enjoy the rye, Doris!
Pamela Dillon
October 13, 2025
Since rye bread has less gluten why add whole wheat when it also has less gluten than organic bread flour?
Yuping Bom
October 8, 2025
Thank you for the great recipe. We enjoyed the end result very much! 🤩😘🥖
Gulie Chaykina
October 4, 2025
This is an excellent recipe! I have been making this bread for the last few months, and it is amazing. I love the texture and the flavour. Although I decided I would bake it differently from regular sourdough bread, I place it in a loaf pan for the bulk size, and once it rises, I bake it right in that pan. It is a heavier bread, so it acts out on me otherwise. Thank you for the recipe; it is easy to follow, and your pictures do inspire!
Amanda Paa
October 5, 2025
So glad you’ve enjoyed it!
Jane
October 3, 2025
Wow, this was really good rye bread! It had the great taste and texture of rye, and also a beautiful open crumb. The overnight rise in the fridge was perfect to develop a sour tang. Handling it is a bit challenging due to the stickiness. Working the dough with wet hands helped! I made a 50% rye starter for this and it worked perfectly! Thanks so much.
Margaret Ridley
September 25, 2025
This is my husband’s new favorite bread, and believe me when I say he’s picky about bread! Thanks for the clearly explained recipe!!
Ute
September 22, 2025
I want to make this but I am in the US. Could you provide American measurements instead of grams please?
Kim
October 29, 2025
You will get a much better result by purchasing a kitchen scale and measuring by weight rather than volume.
Ellen
September 18, 2025
Best sourdough rye bread I have made or eaten. My husband agrees with me. It made wonderful Reuben sandwiches.
Amanda Paa
September 18, 2025
Love hearing that so much!
Joyce
September 11, 2025
Hello thx you from QLD Australia
I love your recipes especially this one for the Rye bread
The few people I make this for also love it.
Thx you again .
Ruth
September 6, 2025
Great recipe. Lovely taste. In Australia we use wholemeal flour instead of whole wheat flour. Was concerned at how it felt but kept going and it turned out just like your photos.
Thank you.
Amanda Paa
September 6, 2025
So glad you enjoyed, and great job trusting the process!
Nikki
September 3, 2025
Whoa- this is a great recipe!!!! Just had some – delicious. Made with fresh milled rye, hard red (for the bread flour) and unbleached AP flour from Costco.
Jane
August 29, 2025
I used this recipe as my first attempt at making a sourdough loaf. It was so good. My loaf did not rise that high but the end result was soft inside and wonderfully chewy crust on the outside. I did not have a proper banneton basket so I used a tea towel lined mixing bowl and left it in the fridge overnight covered with a damp towel. It was extremely sticky but I just kept following and trusting the process.
Ilana
November 25, 2025
I had the exact same. In a bowl, and it was also stick. I found it slightly hard to scorr. I have one in the oven now, si we shall see. I think it didn’t rise as much ss my previous boule.
Kristy
August 28, 2025
Could I use Dark Rye instead of Light Rye?
LARAINE AGREN
August 27, 2025
l have made this twice, the second time in an Anova steam oven. This bread is the best rye l have ever eaten, with just the right amount of chewy texture and excellent crust. l added 1-1/2 T of caraway seeds to the flour, and also used an egg white wash to stick caraway seeds onto the crust before l scored it. Baked it cold in a 475 degree steam oven, then shut the steam off and turned the heat down to 420 for about 15 minutes. l used a temperature probe that showed 185, and within 5 minutes the temp jumped to 208 and l pulled it. Hard to wait to let it cool, but l did and tried it with cream cheese. So great. Thank you for your recipes and tutoring .
Amanda Paa
August 27, 2025
Oh, I’m jealous of your steam oven! So glad you enjoy the recipe, thanks for sharing your notes.