Cheesy Sun-Dried Tomato Sourdough Bread
By Amanda Paa – Updated February 3, 2026
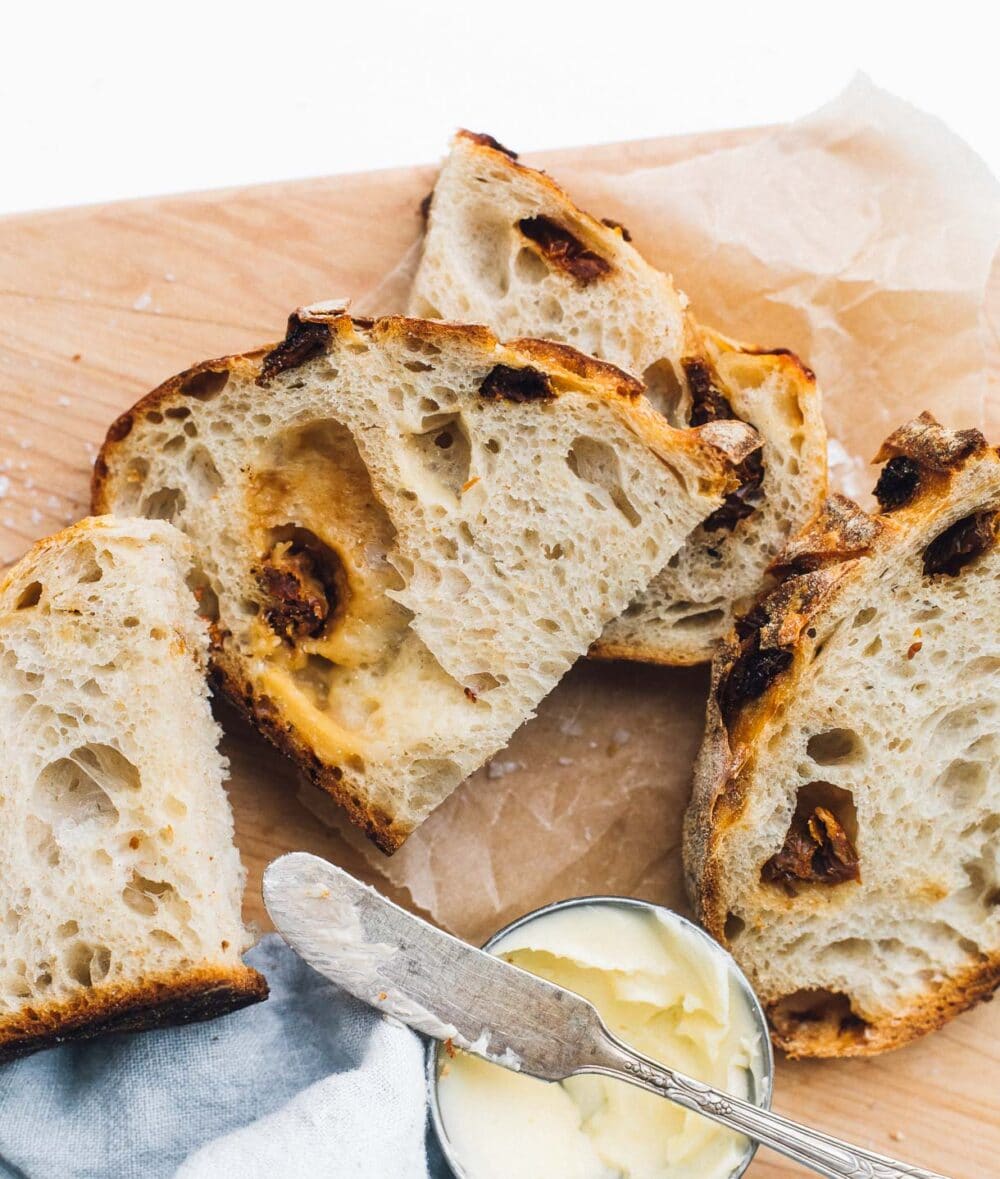
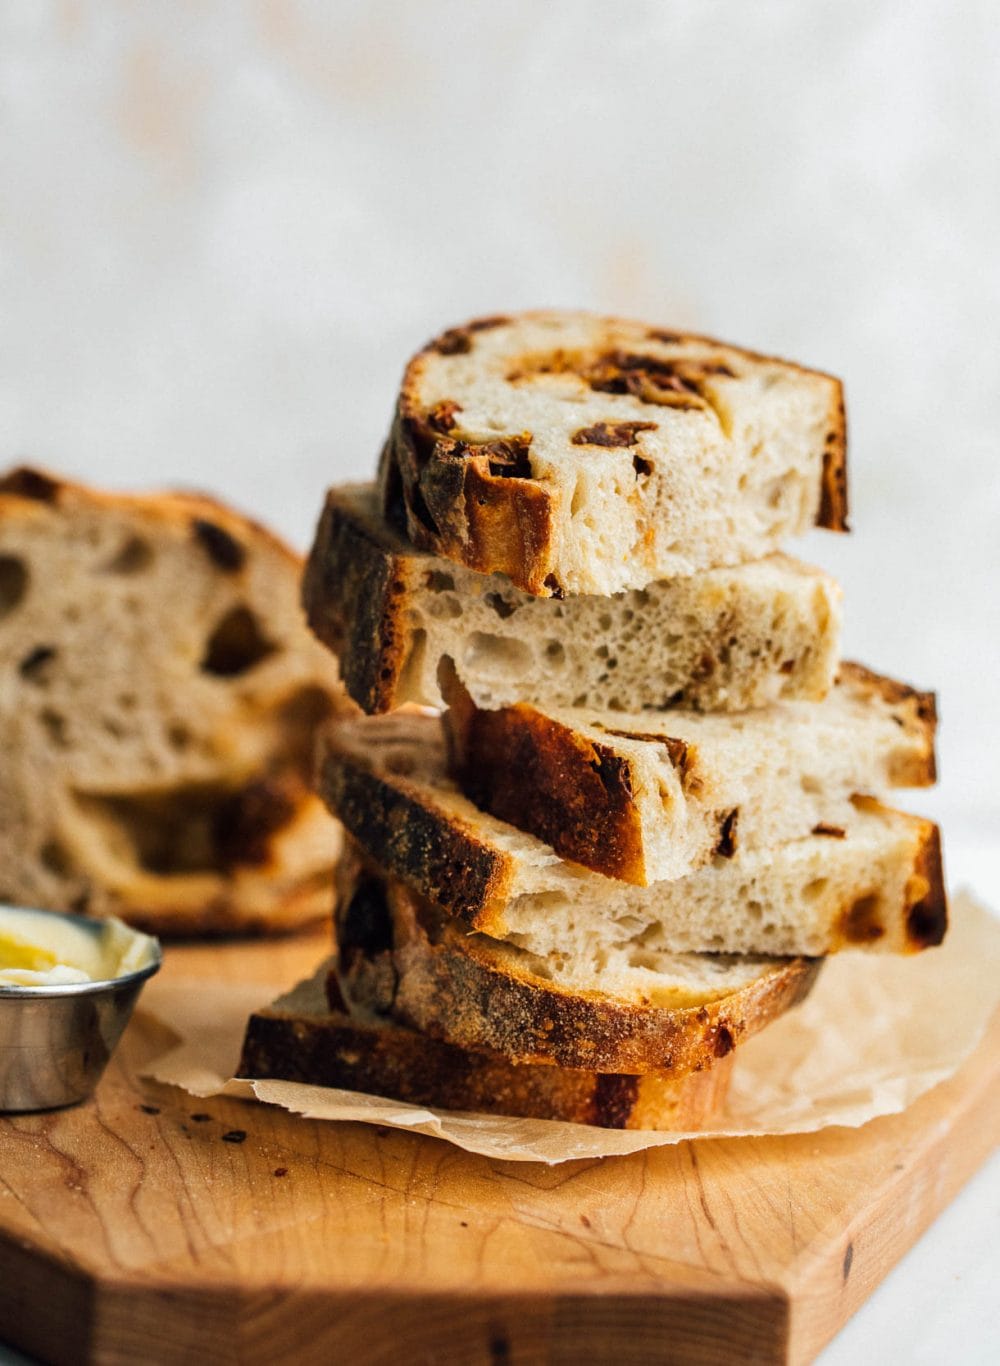
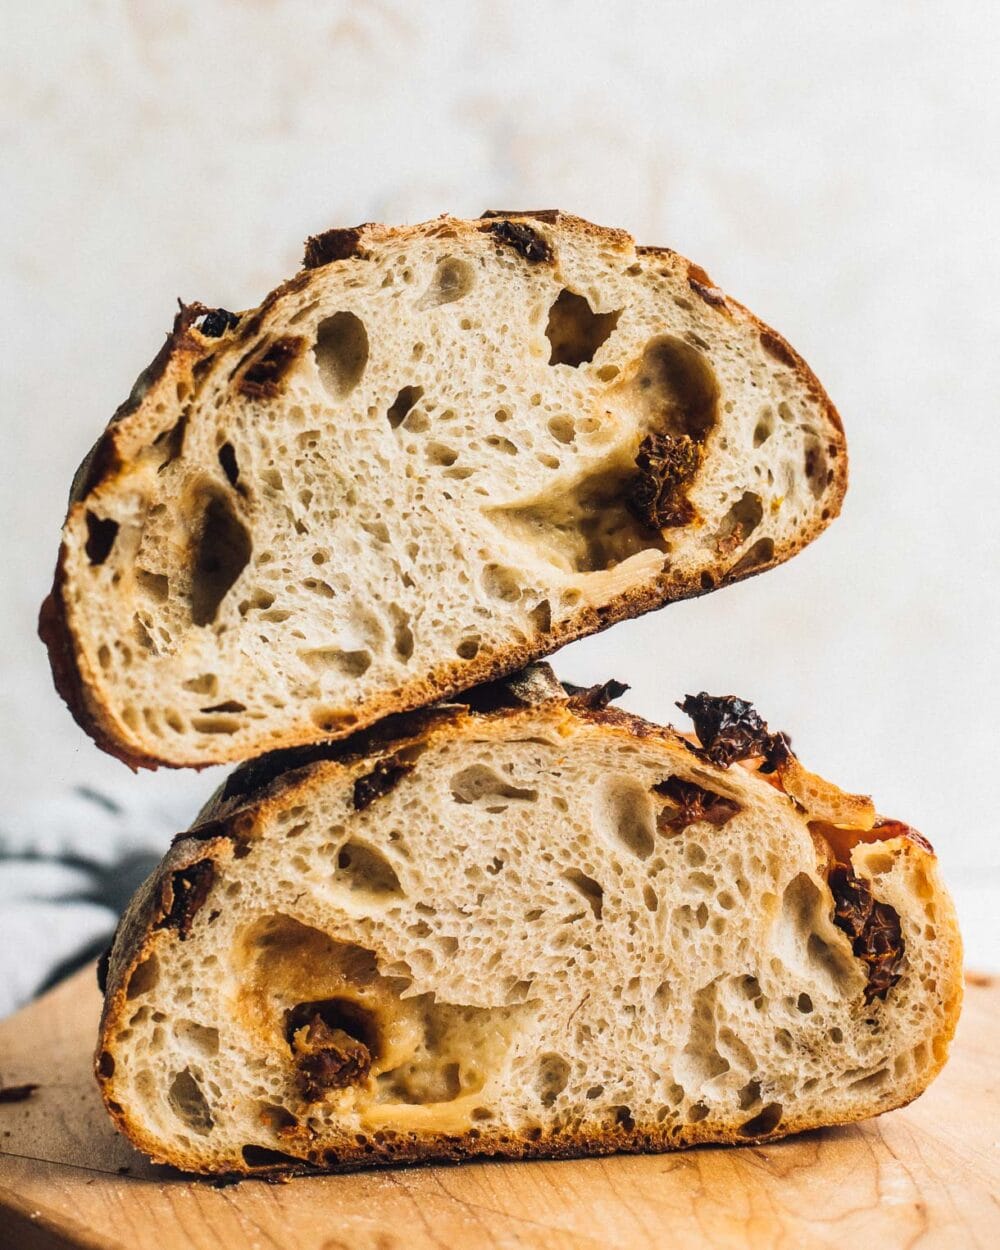
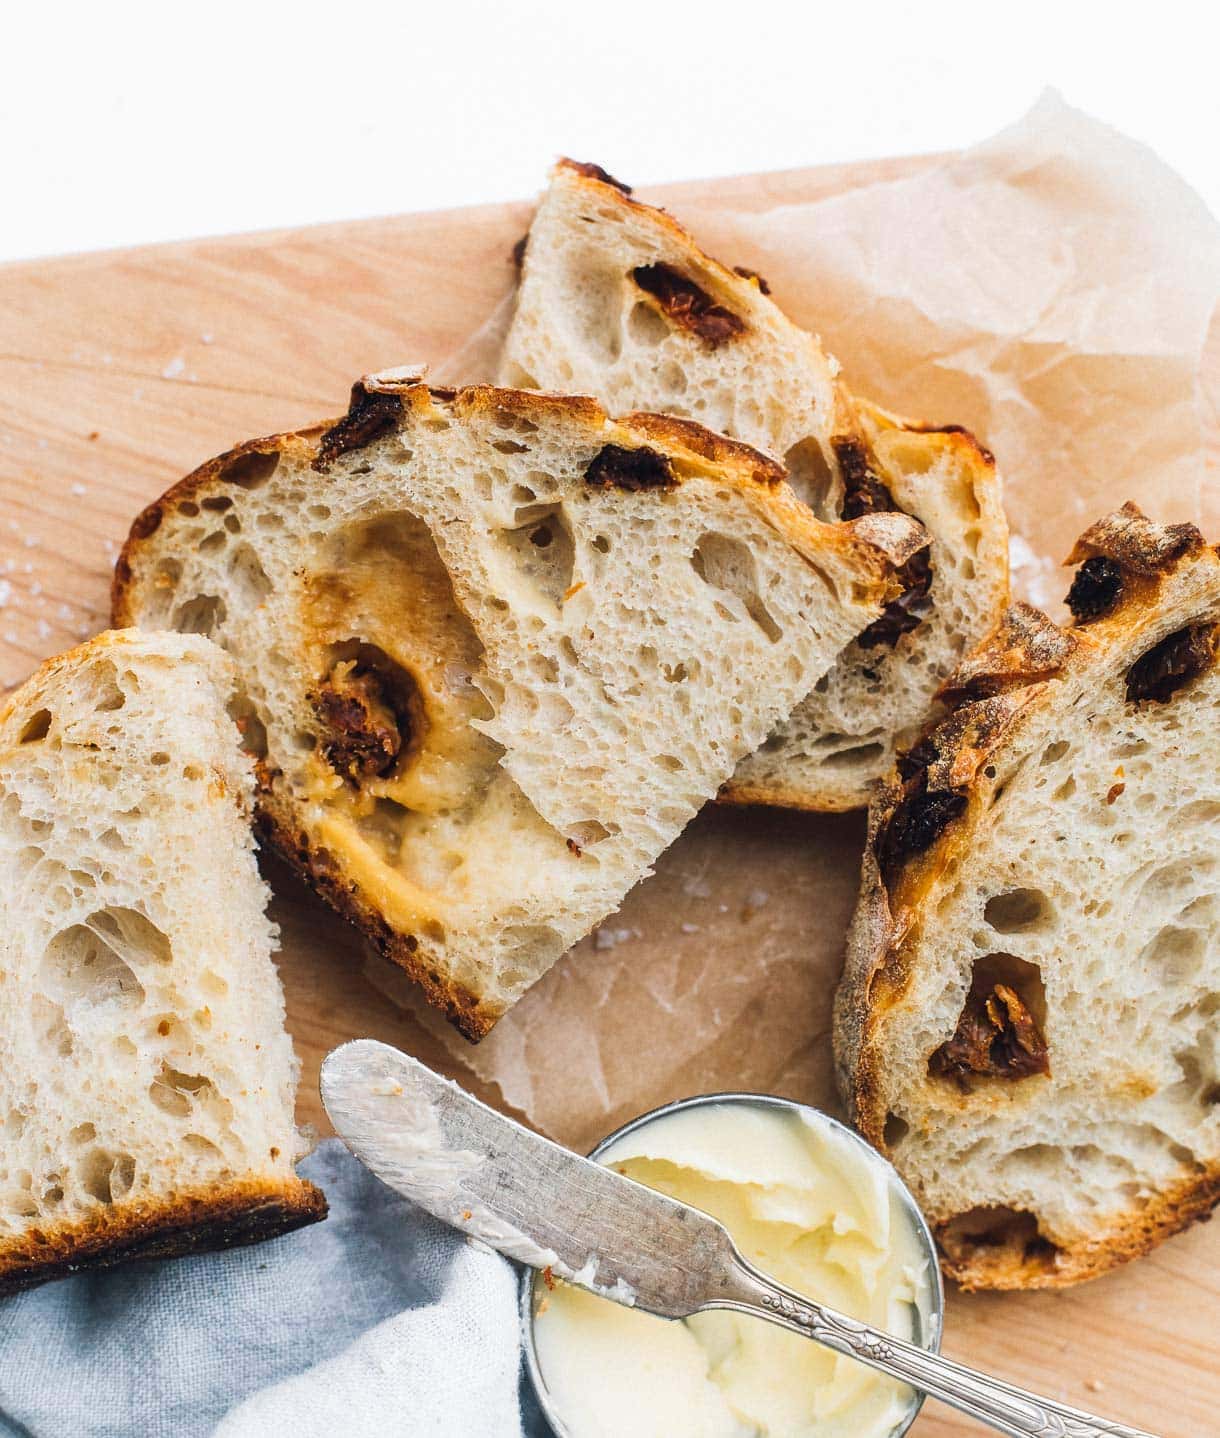
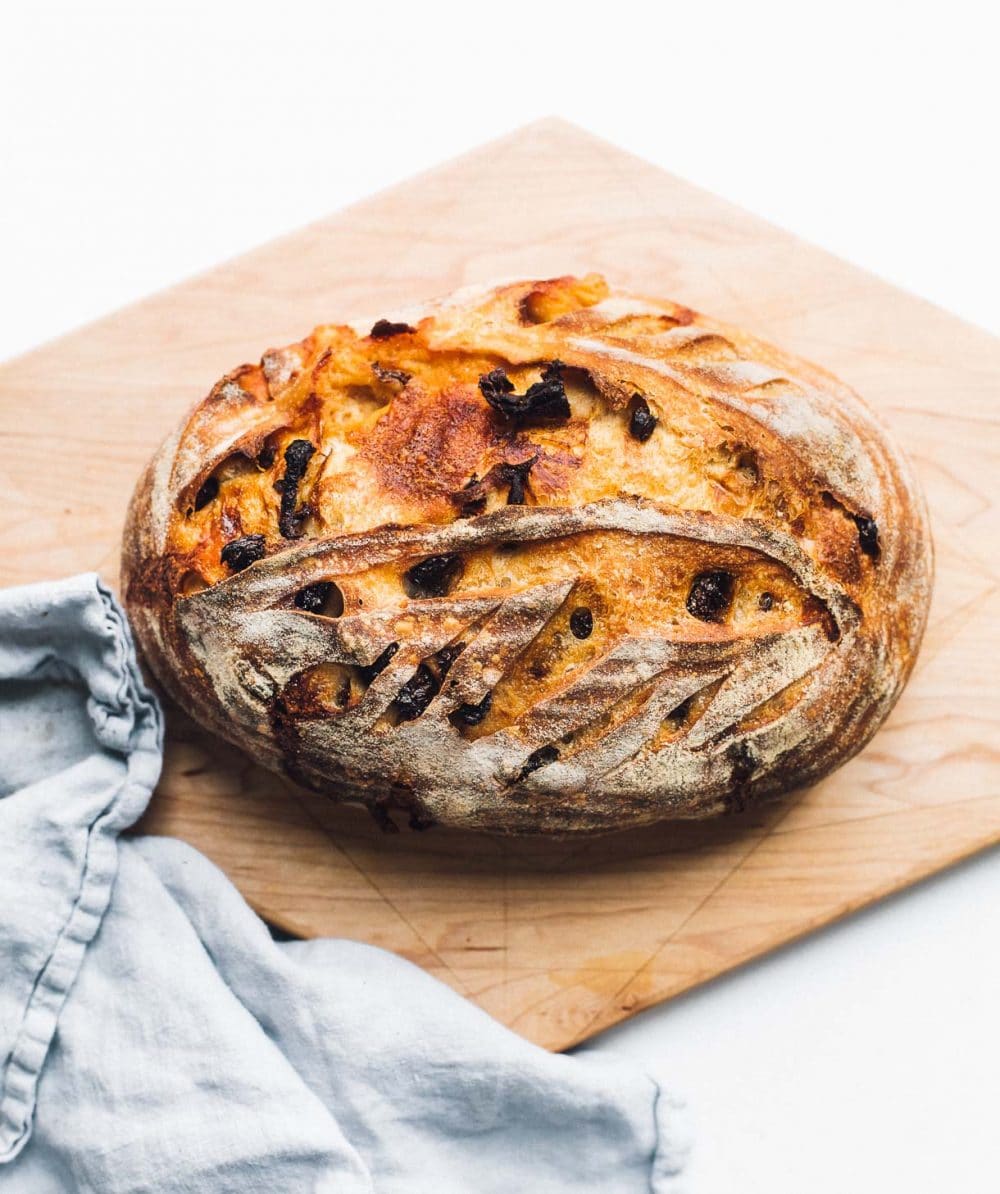
This recipe makes the tastiest loaf of Sun-Dried Tomato & Cheddar Sourdough, with pockets of cheese and pops of sweet-tart tomatoes in each bite. It tastes like pizza bread! Using active sourdough starter, this loaf has wonderful flavor and a soft crumb. The crust acquires some of the cheesiness, too!
Jump to Recipe
This post may contain affiliate links. Please read my disclosure policy.

Okay, so you like pizza. You like the glorious amounts of cheese, the sweet tomatoes, the bubbly golden crust… Well, this Sun-dried Tomato & Cheddar Sourdough is all of that and MORE, in loaf form.
And we can’t stop eating it.
Between the pockets of melty cheese,
bright, concentrated pops of tomatoes,
salty goodness, and a subtle tang from the sourdough component…. It’s incredible.
The crumb is soft with a bit of chew, and tiny bubbles from excellent fermentation. The tomatoes bring an intense sweet-tart flavor, one which seems to subtly permeate the entire loaf.
Perhaps my favorite part is the cheese that makes its way to the top of the bread, oozes out, and begins to form a cheese crust, just like my jalapeno cheddar sourdough. YUM.
Tips for adding the inclusions:
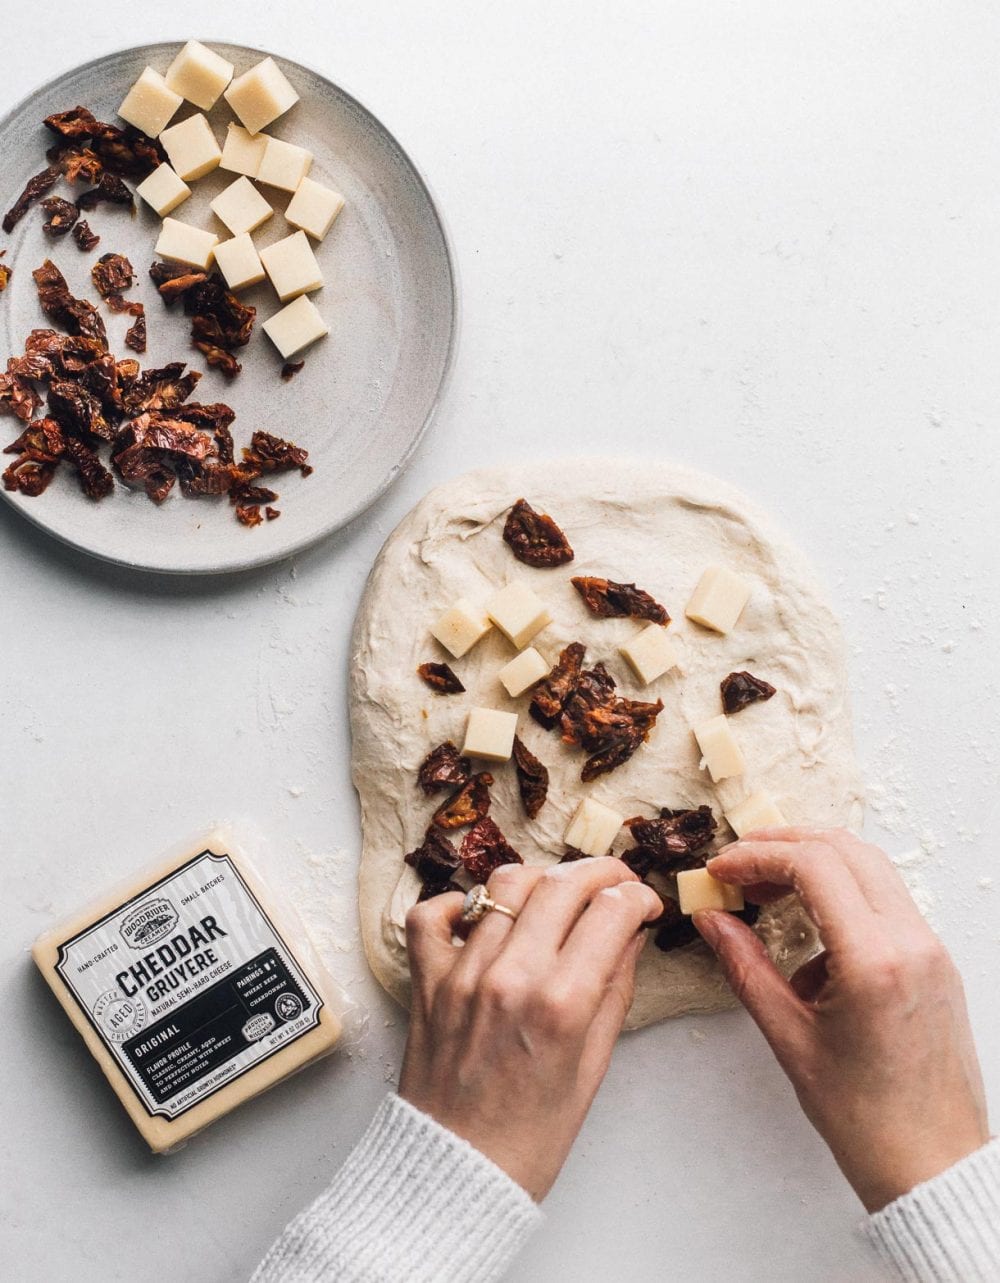
Just as in my Jalapeno Cheese Sourdough, you’ll fold in the cubed cheese and rehydrated sun-dried tomatoes during the 4th and final set of stretch and folds. Added earlier, it can negatively affect the fermentation, reducing the final rise in the bread.
In this recipe, you’ll simply soak regular sun-dried tomatoes in hot water to reconstitute them. Then drain and rinse to remove excess salt, and gently squeeze between paper towels before chopping into smaller pieces (if they are sun-dried tomato halves). That way, little pops of sweet-tart flavor are distributed in each bite.
Favorite ways to eat it:
This cheesy sourdough bread is a savory delight. Here are my favorite ways to eat it:
- dipped in olive oil and balsamic vinegar
- deli sandwich style, with smoked turkey, lettuce, and mayo, and hot pepper jelly
- toasted with ricotta and red pepper flakes
- as a breakfast sandwich, with a fried egg and spinach

Yield: 1 loaf
Equipment
Ingredients
- 60 grams active sourdough starter
- 310 grams filtered water little warmer than room temp
- 370 grams organic bread flour
- 30 grams whole wheat flour
- 7 grams fine sea salt
- 90 grams cheddar or gruyere cheese, cut into 1/4 to 1/2 inch cubes
- 40 grams plain sun-dried tomatoes, not in oil
Instructions
- In a large bowl, mix starter and water with a fork, until starter is dispersed.
- Add flours, mixing with a spatula first. Then with your hand until a shaggy dough is formed, just enough so that flour is not visible.
- Sprinkle salt on top of dough. Cover bowl with a damp cloth and let sit for 40 minutes to an hour. While the dough is resting, rehydrate the sun-dried tomatoes by pouring boiling water over the top of them in a bowl.
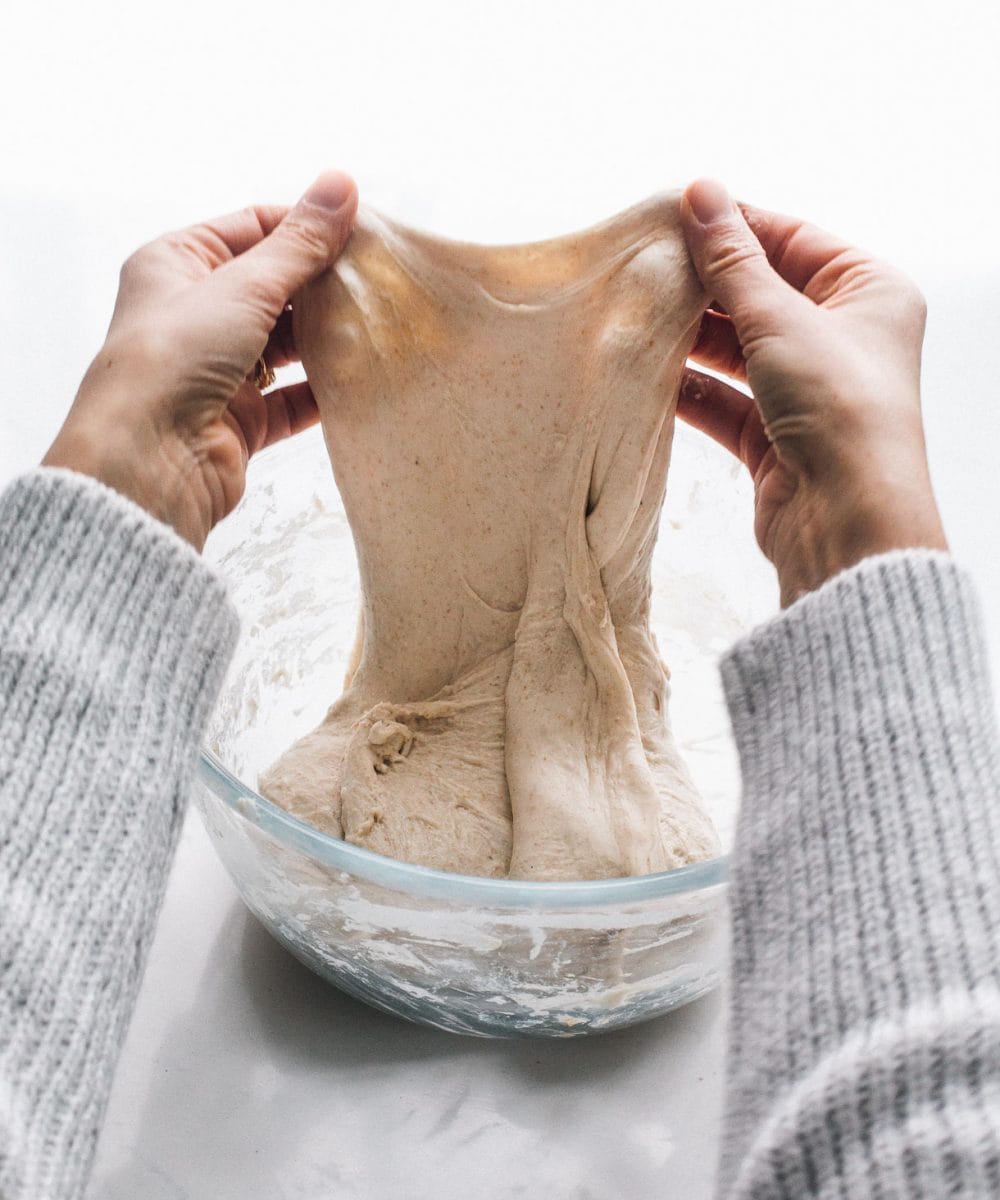
- Now work the salt into the dough, squeezing the dough and mixing for 1 minute. Then as you perform your 1st set of stretch and folds. Then let rest for a half hour. Perform 2 more sets of stretch and folds, waiting the 30 minutes in between for each. (In essence, you are doing a total of 3 sets of stretch and folds over the course of 1 1/2 hours.)
- After you have completed your 3rd set stretch and folds, wait another 30 minutes.
- Drain and rinse the sun-dried tomatoes (important because some brands dry theirs with salt, which needs to be rinsed off or you will have a very salty bread). Pat slightly dry, and chop into pieces.
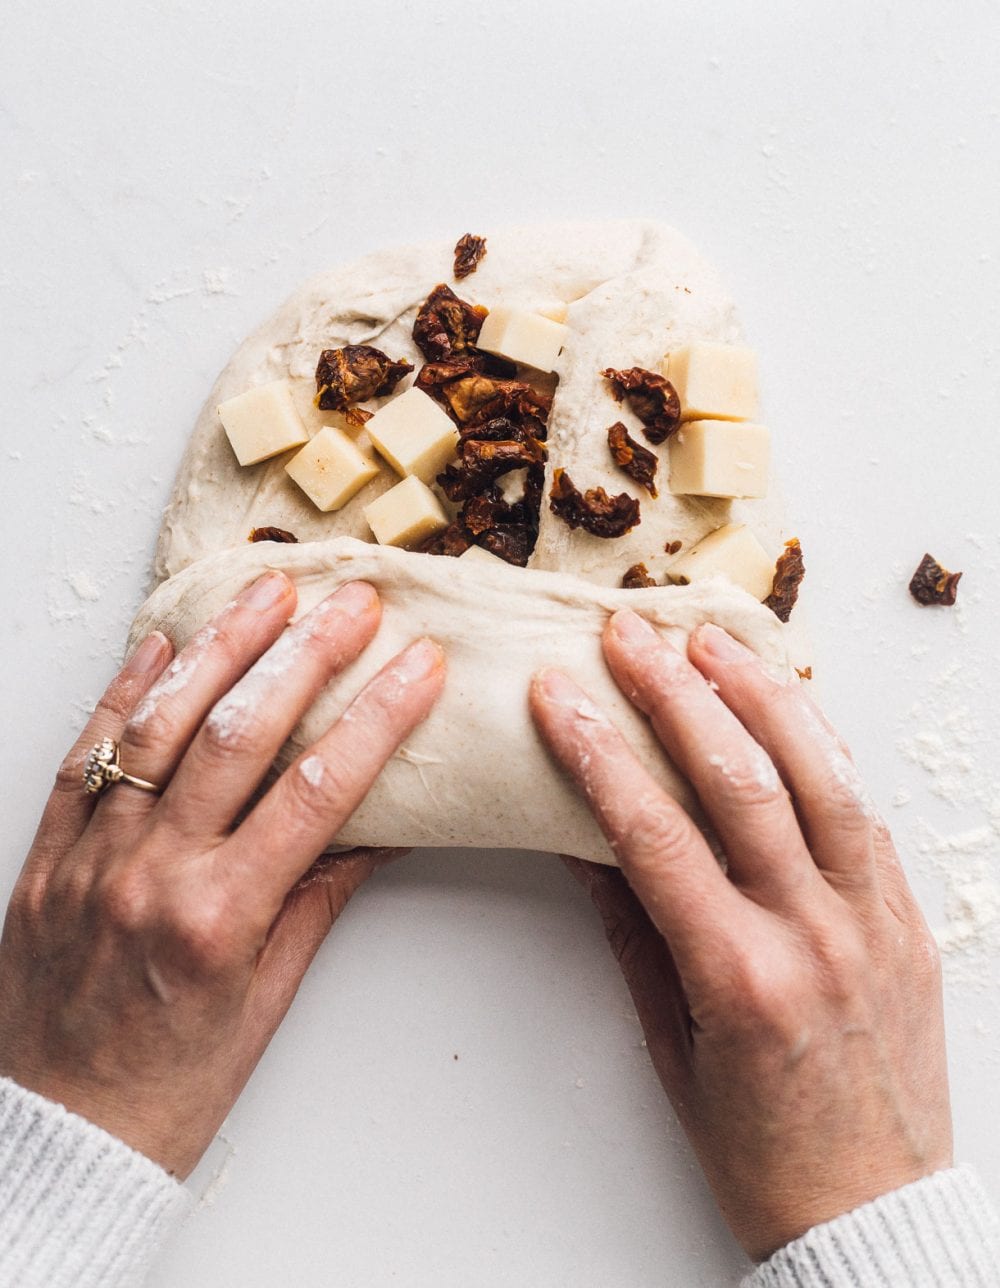
- Now you will add the mix-ins. To do this, use a bench scraper to gently remove your dough from the bowl onto a lightly floured surface. Use your hands to gently stretch the dough out into a rectangle about 12 inches X 14 inches. Distribute the cubes of cheese and sun-dried tomatoes over the inside of the dough, leaving about a 1 inch border. Gently pat the ingredients with your hands so that they stick to the dough.
- Using lightly floured hands, gently pull one long side of the dough out, and over 1/2 of the dough. Do the same with the other long side of the dough, so both meet in the middle. Now you’ll have long cylinder like log. Gently roll the dough up so it is a round shape and put dough back into bowl. This step doesn’t have to be perfect, it isn’t the final shaping.
- Let the dough bulk ferment on your counter, covered with a damp cloth for about 5-6 hours if your house is around 70 degrees. It will take more time if it is cooler, or less time if it warmer.
- When your dough has grown about 40-50%, has a smoother top and bubble or two peaking out the top , it is ready for shaping.
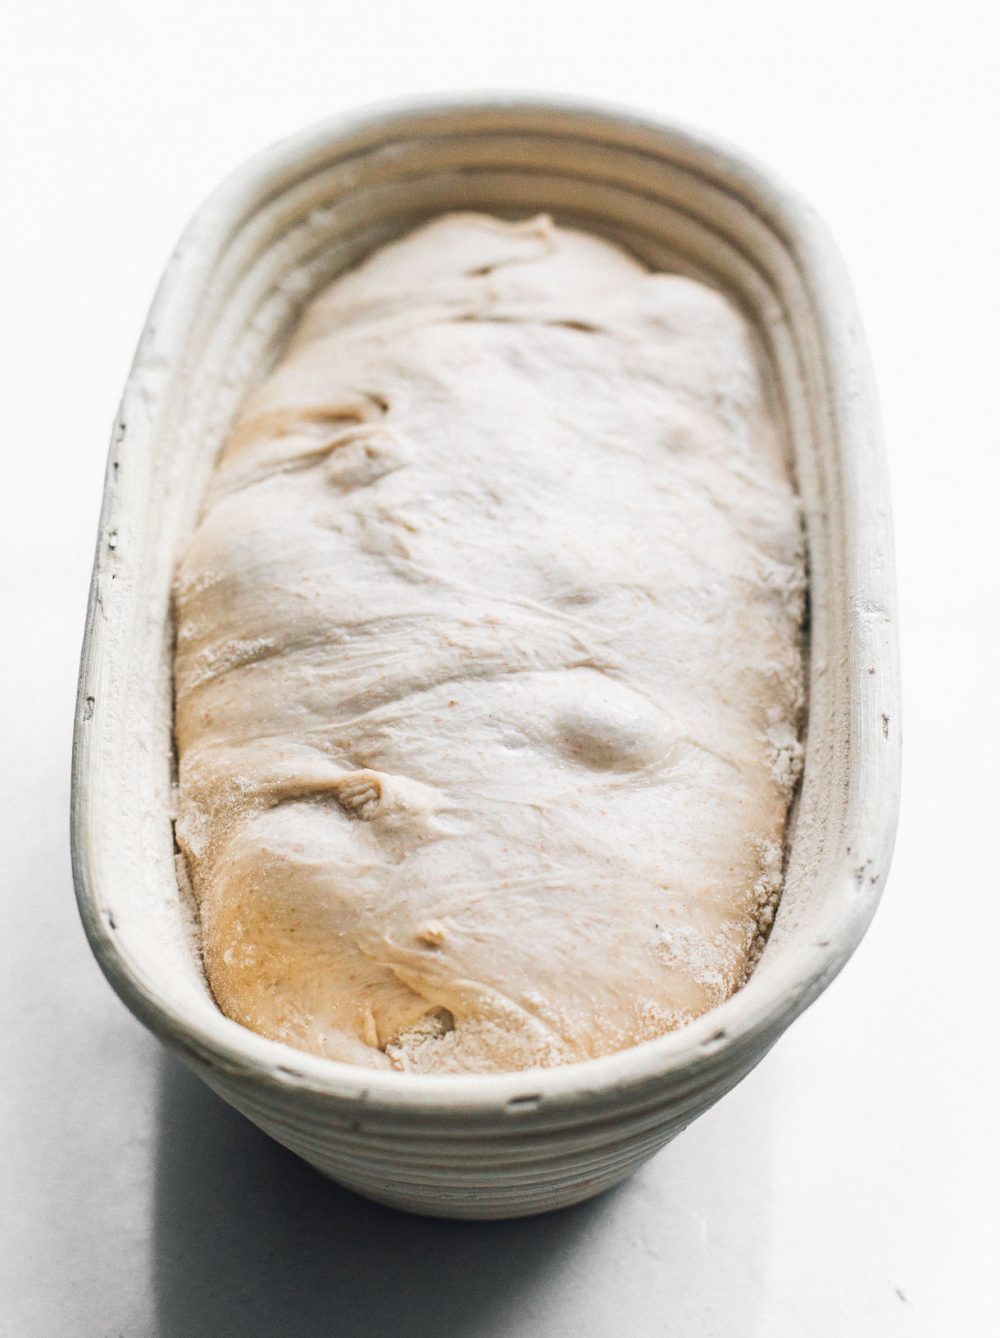
- Gently move the dough out of the bowl onto a floured work surface. Let the dough rest for 10-15 minutes. Then, shape the dough. Once shaped, use a bench scraper to put the dough into a rice flour dusted banneton (proofing basket), seam side of the dough facing up.
- Cover with a damp cloth, and let rise for a final time, either on the counter which will take about 2 hours if your house is around 70 degrees – OR you can put it in the refrigerator in a garbage bag, and let the final rise happen overnight. The dough can be in the refrigerator for 8-10 hours at this stage. (If you do the final rise in the fridge, score and bake straight from the fridge. This makes it easier to score and hold its shape.)
- Once your dough has gone through its final rise and has risen 30-40% and is puffy on top, you’re ready to bake. You can test to see if your dough is ready by doing gently pressing a floured thumb into the dough. If it indents and gradually releases, but still holds a finger shape, you’re ready. If it indents and doesn’t release at all, it still needs time to rise. Let it ferment in half hour more increments, until ready.
- Preheat your oven with dutch oven inside of it, to 450 degrees F.
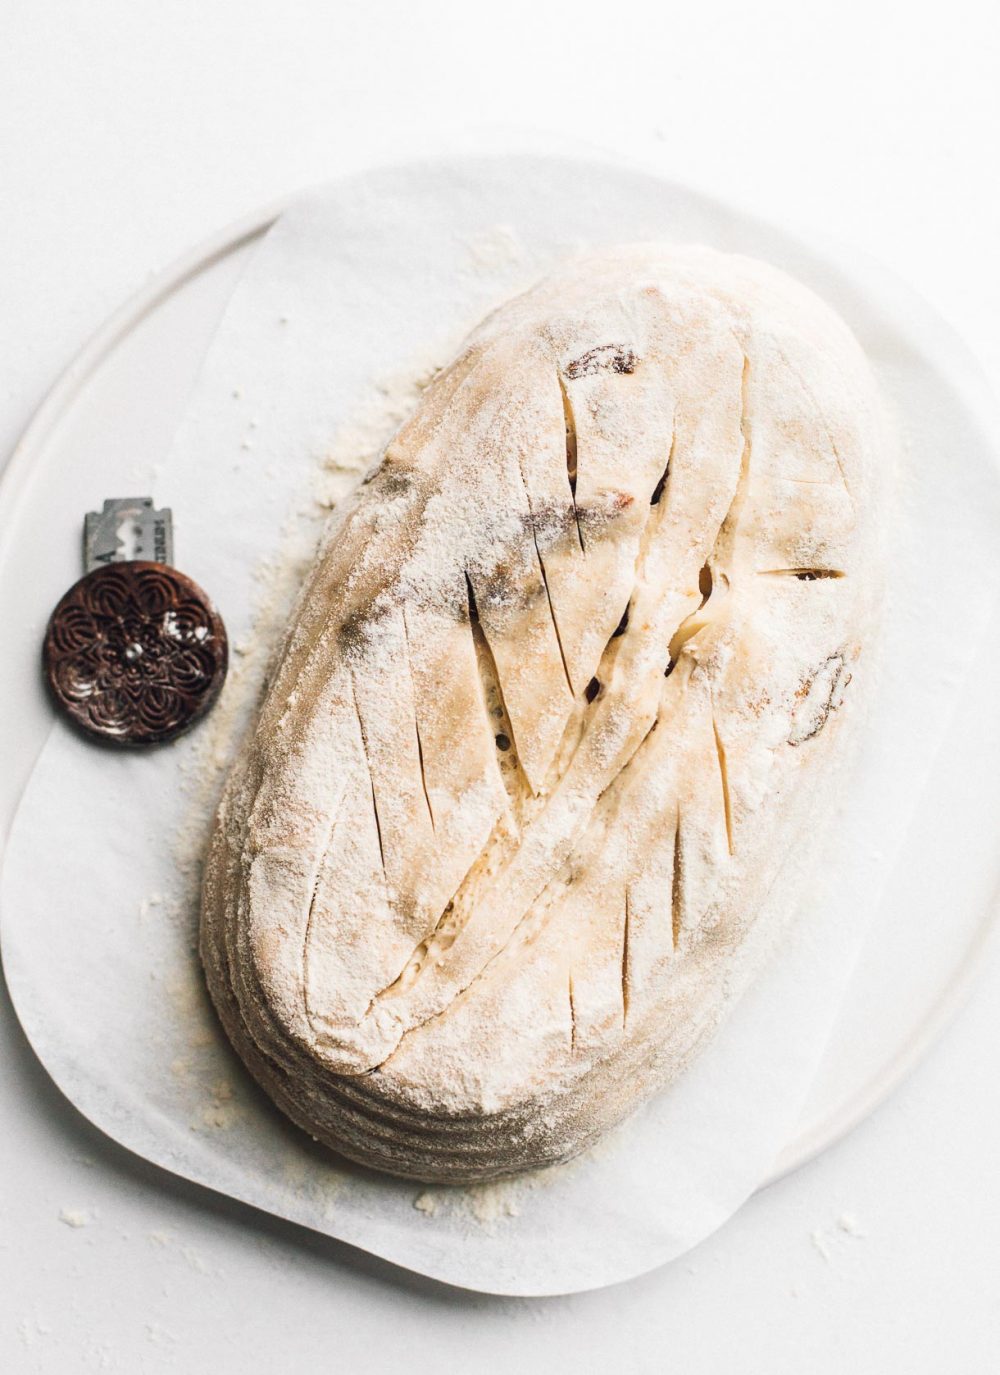
- Wait until oven is preheated, then place parchment over the top of your dough and flip over, so that the seam side is now on the parchment paper and you are able to score the top of the dough. Score the dough with a bread lame, making sure to go at least 1/2 inch deep in a few spots so that dough can release gases. Otherwise your bread will not rise.
- Place dough on parchment paper into dutch oven, and put cover on it. Bake for 25 minutes, covered. Then remove cover, turn oven down to 435 degrees F and bake for 15-20 more minutes, until bread is golden brown and crackly.
- Remove from oven and place load on a cooling rack. Let cool for AT LEAST ONE HOUR before slicing. Otherwise the crumb will be squished and the texture will be gummy.
Did you make this?
tag @heartbeetkitchen on instagram and hashtag it #heartbeetkitchen
January 25, 2021
Colleen
October 24, 2025
I just made this & it’s amazing. It was hard to wait to let it cool a bit. Recipe was easy to follow.
Linda Logue
May 29, 2025
My bread came out very well I would attach a picture but can’t figure out how
Amanda Paa
May 29, 2025
So glad to hear that, Linda! (My website doesn’t have uploading capabilities for comments, sorry!)
Linda Logue
May 28, 2025
Is there anyway to use sun-dried tomatoes in oil? Can I drainwell rinse and pat dry? That is what I have in frig and have been wanting to use them up
Amanda Paa
May 28, 2025
Hi Linda, that should work! Just know that the bulk fermentation may take a bit longer because oil will slow down yeast activity just a tiny bit.
Natasja
March 10, 2025
This bread is dangerously good! Second SD recipe I’ve tried of yours and I think I may just make them all! After I make this one again lol
Amanda Paa
March 11, 2025
So glad you enjoyed it! I feel like this recipe is often overlooked but it’s so delicious!
Natasja
April 17, 2025
I love this bread so much that I started making it one day forgetting that I didn’t have any sun-dried tomatoes lol. I did have Kalamata olives, so I decided to try squeezing out their liquid and leaving them on a paper towel to dry in the time where I would normally have the sun-dried tomatoes rehydrating. I didn’t change anything else, including reducing the hydration and while the bread was absolutely delicious, the dough was definitely too wet. Do you have any idea how much I should reduce the hydration if I try it again? Either way, your breads have become my absolute favorites!
Wendy Fung
November 11, 2024
I just baked this by following your steps from mixing, amazing and fluffy SD is made. Thanks! By following your recipe, could I change the tomato & cheese to seeds only? If yes, any I need to pay attention when using seeds? Thanks very much
Amanda Paa
November 12, 2024
So glad you enjoyed it, Wendy! I do have a Seeded Sourdough Bread recipe that sounds like what you are looking for.
Melissa
April 28, 2023
Instructions were so easy to follow, loved the stretch and fold video tutorial and the photos throughout. So good!!!
Amanda Paa
April 30, 2023
Yay, so glad you enjoyed this recipe Melissa! Thank you for making it.
Debra
March 26, 2023
Hi Amanda,
Wow this looks amazing. I can’t wait to try it. I absolutely love your rustic rye recipe and have made it a number of time. It’s consistently delicious. Thank you!
Question: I’d like to try to make a sourdough olive loaf and was wondering which recipe of yours could be my guide? Perhaps this one? Or do you suggest another? I figure I could just replace the inclusions on the 3 rd stretch & fold. Thanks and I totally have kitchen envy 🤣
Amanda Paa
March 26, 2023
Hello! I actually think my jalapeno cheddar sourdough would be best to follow for an olive and cheese bread. I would coarsely chop the olives and pat slightly dry. Use the amount of jalapenos called for, but swap with olives. Enjoy!
Germaine
April 28, 2022
Thank you for the recipe. Wondering if i can make 2 loaves using this recipe but one filled with Walnut and Fig? any adjustment needed? how do you determine your starter % – i noticed that your % range between 12-13% ? Thank you
Amanda Paa
April 29, 2022
Hi Germaine! I haven’t tested this with walnuts and figs. You may want to try my Honey Walnut Sourdough as a guide.
Suzanne Sears
November 17, 2021
Absolutely gorgeous tasting bread. Will be making this again in weekly rotation.
Amanda Paa
November 17, 2021
so glad you liked it, Suzanne!
Shannon
August 17, 2021
EXCELLENT! This bread is wonderful and the flavors are perfect! Easy to make and will be in rotation with our summer tomatoes that we sun dried! We have made sandwiches out of it, my sister-in-law did a bruschetta with the one we made her. It is delicious toasted too! Another great recipe from Amanda!
Michael O’Callaghan
March 6, 2021
Absolutely fantastic bread. It is INCREDIBLY DELICIOUS toasted (we have a toaster with longer slots for artisan bread).
Amanda Paa
March 8, 2021
so glad you liked it, Michael! thanks for letting me know.
Lynda
February 13, 2021
This bread looks so delicious! Is it possible to ferment the dough 72 hours and if yes at what point would I do that? I’m looking forward to trying this recipe!
Amanda Paa
February 15, 2021
hi lynda! can you explain what you mean by ferment the dough 72 hours? did you mean at 72 degrees?
Lynda
February 15, 2021
No, I meant leaving it in the fridge for 72 hours so that the gluten is reduced as much as possible. I am gluten intolerant, but when I ferment the dough in the fridge for 72 hours I am able to eat it.
Stacey
February 7, 2021
This bread was so good! The bottom had a wonderful crunch, the amount of mix ins was perfect and the flavor was outstanding. I was skeptical when proofing and shaping since my cheese cubes were starting to poke out. But I followed the recipe to a T and it came out great!
Amanda Paa
February 8, 2021
yay! i’m so glad you liked it. happy baking!
Shannon
January 31, 2021
Amazing! Another wonderful bread by Amanda! Due to the “snow storm” I wasn’t able to get the exact cheese (will be soon) but Amanda said another cheddar would work. I used a white cheddar with garlic and herbs and that worked well. Amanda’s recipes are so easy to follow and the results are always great! Cannot wait to make this and share with friends or give as a gift loaf. Wonderful!
Amanda Paa
February 1, 2021
Yay, so glad you liked the bread! I just love the combination of the cheese with the deeply flavored tomatoes. Thanks for letting me know how it turned out for you.
Ania
January 31, 2021
Is the final shaping done the same way as with other sourdough breads? Meaning as aggressively since the cheese and sun dried tomatoes are inside?
Amanda Paa
January 31, 2021
You’ll find that there isn’t as much stretch in the dough because it is full of the add ins. It will come together in shaping quite easily.