Easy, Bubbly Sourdough Pizza Crust (great for outdoor pizza ovens!)
By Amanda Paa – Updated July 18, 2025
Discover the ultimate guide to creating the most delectable homemade pizzas with an outdoor gas pizza oven! Compared to its wood-fired counterpart, using a gas pizza oven is a breeze, offering shorter preheat times, eliminating the need for wood, and providing precise temperature control. Whether you're a beginner or a pizza-making expert, this comprehensive guide will help you craft mouthwatering pizzas with a perfectly crisp crust and a delightfully pillowy crumb. Our tried and true sourdough pizza recipe is included!
Jump to Recipe
This post may contain affiliate links. Please read my disclosure policy.


Top 5 Tips for Making Sourdough Pizza in an Outdoor Gas Pizza Oven
- Have all of your ingredients ready, including sauces opened with spoons in them, cheese shredded, and toppings sliced! You will be working fast once the pizza oven is at the temperature you need it, and it makes things so much easier to prepare. I put everything onto a tray for easy carrying, access, and clean-up.
- Temperature Control. Be sure to have an infrared thermometer gun for testing the temperature of both the upper dome and main hearth stones. This ensures you won’t be guessing at the temperature and can monitor and adjust throughout the cooking process. I find that the heat on the stones will continue to climb even if you have it set to a certain level such as low, medium, or high.
- Use finely ground cornmeal on your pizza peel so that you can easily slide the dough into the oven. Cornmeal creates a non-stick surface and your dough benefits too, as it gives it a bit of a crunch!
- The right dough. Not all dough recipes are created equal. Make sure your dough recipe is made for a pizza oven, like my tried and true, Pillowy Sourdough Pizza Crust. A recipe that works in a regular oven will not translate to baking well in a pizza oven since it is several hundred degrees hotter and bakes pizzas in a very short amount of time.
- Have two pizza peels. They are less than $10. Sometimes you’ll need to take a pizza out of the oven and if you’re working on topping the dough for the next pizza, a single peel would be being used. By having two peels, you will be able to work more efficiently.
What Temperature Should an Outdoor Pizza Oven Be At?
Practicing on your pizza oven is the best way to learn how the heat distribution works, how hot it can get, and your ideal bottom and top stone temperatures. It takes some trial and error, and just know that is normal! I had a few burnt pizzas my first few rounds. :)
With the Delta Heat Pizza Oven, you can control the heat of the top dome and bottom hearth with two separate controls. This is a huge benefit, as I have learned that keeping the top dome at a high temperature of 750 to 800 degrees F and the bottom hearth around 450 degrees F allows the pizza top to cook perfectly into melty, golden bliss while the crust bakes up soft and pillowy.
Why I Prefer a Gas Pizza Oven over a Wood Fired Pizza Oven
I’ve had the opportunity to make pizza in both wood fired pizza ovens and now a gas pizza oven. Without a doubt, I prefer a gas pizza oven, which is much easier and convenient to use with consistent results, giving you the bubbly, puffy, golden homemade pizzas you’ve dreamed of.
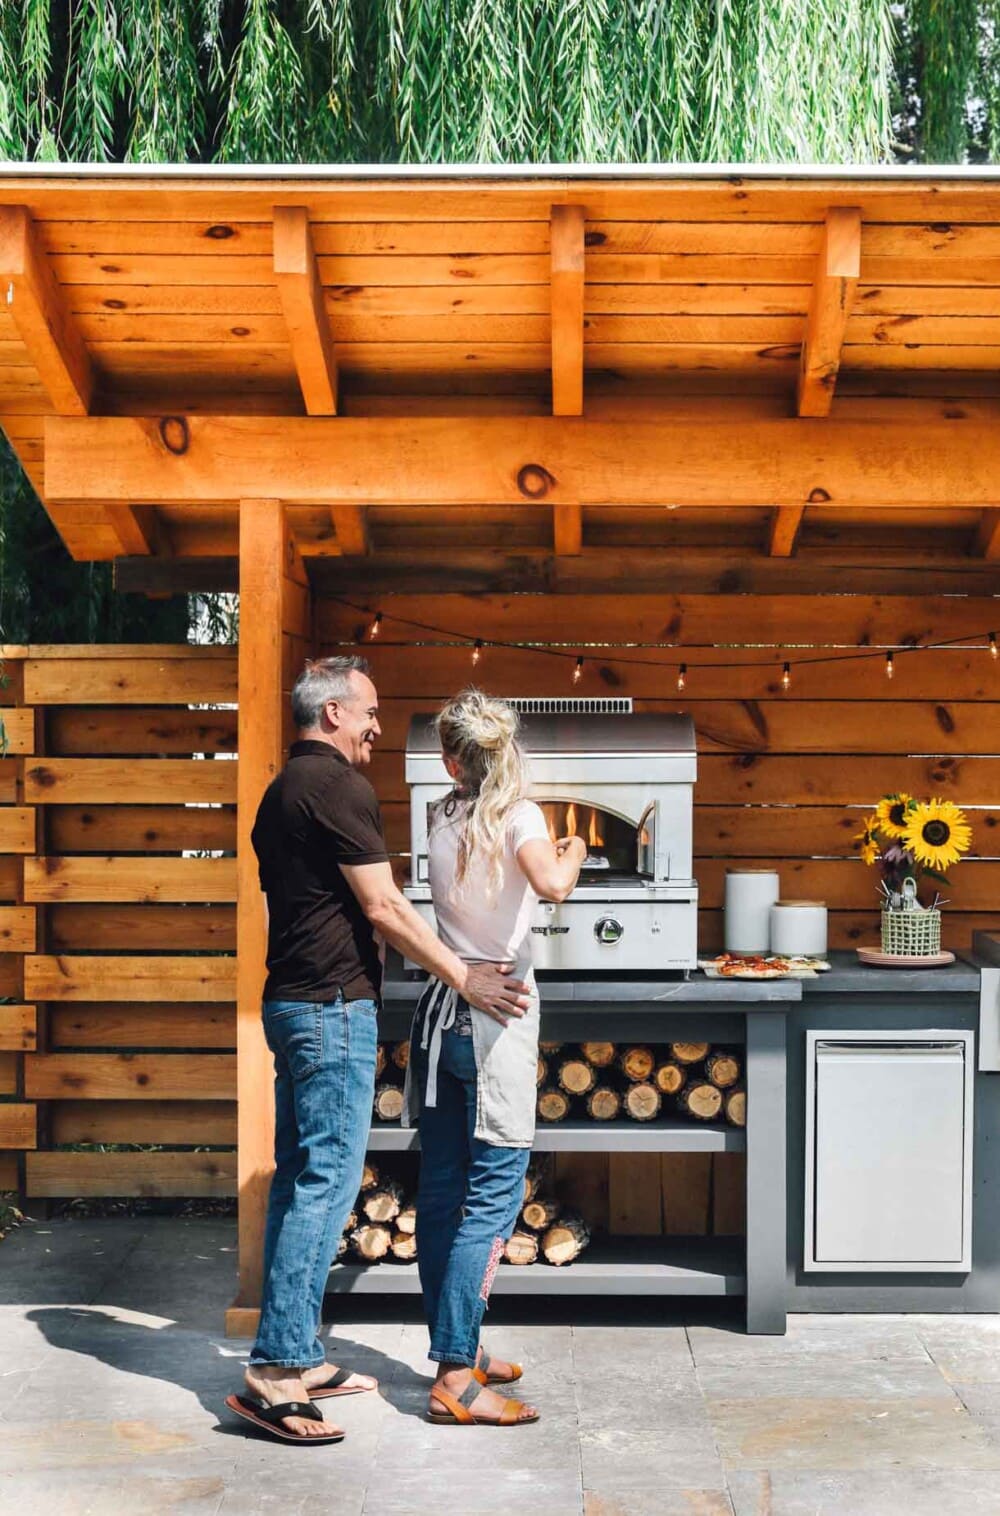
I am in love with the Delta Heat Gas Pizza Oven that we installed in our outdoor kitchen! My easy sourdough pizza crust recipe has been formulated to create the tastiest pies to emerge from your pizza oven, too.
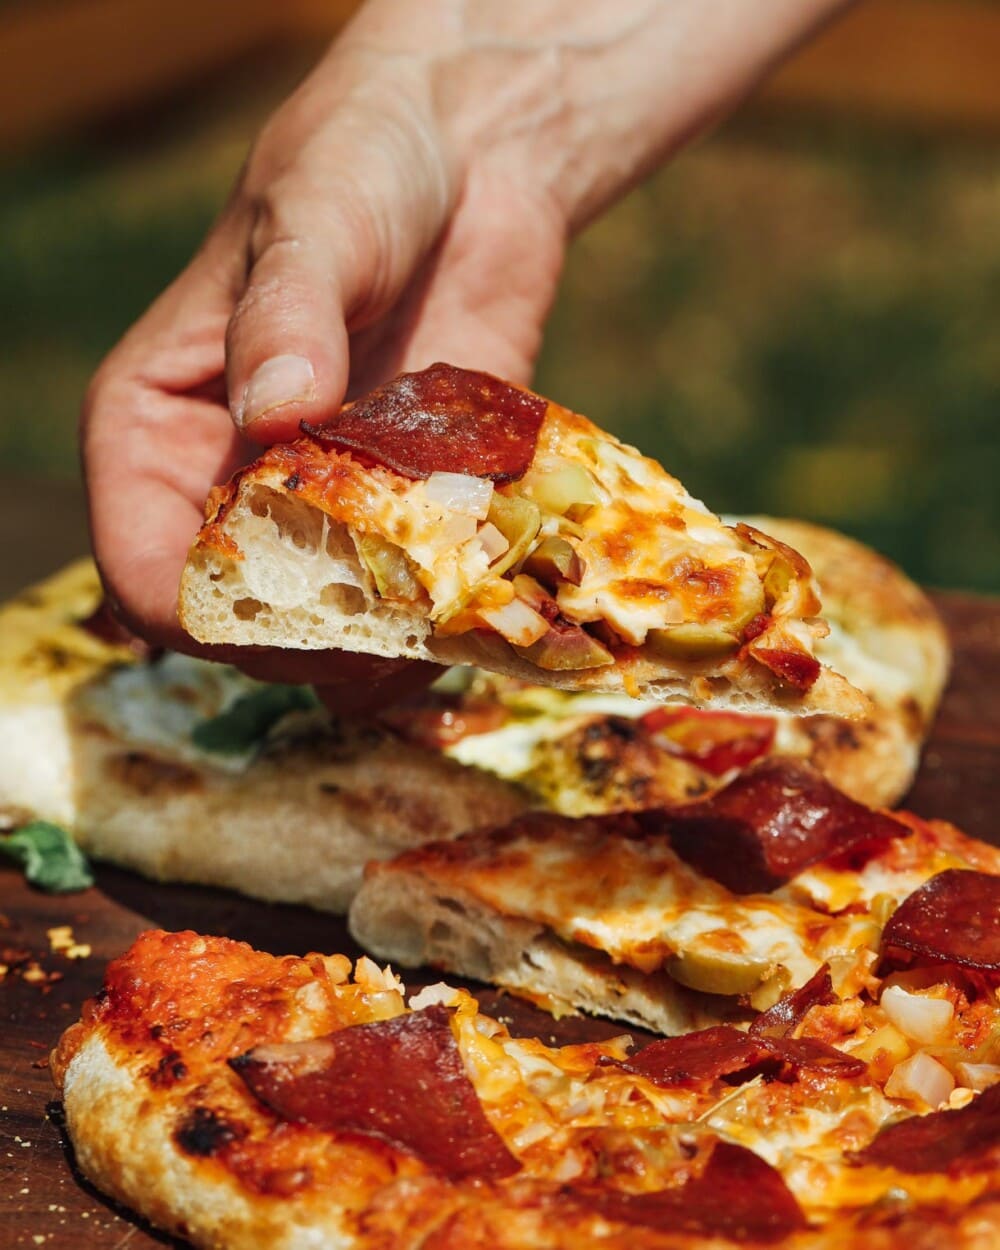
- Unlike a wood fired pizza oven, which has to be started hours beforehand to build significant heat, the Delta Heat Gas Pizza Oven fires up with the turn of two burners and the stones reach up to 800 degrees F in 15 minutes. The preheat is QUICK. There is a 43,000 BTU output with both hearth and dome burners! That’s incredible, and what gives you the beautifully puffed, nicely charred crust you see here. No expertise is needed to get the oven started, just the turn of the burner knobs.
- I love that this pizza oven has the ability to control both the top dome and bottom hearth temperatures independently allows for a perfectly cooked pizza dough without overcooking the rest of your pizza. This is a huge benefit. I have been so impressed with this feature, and how well the Cordierite stones retain their heat.
Temperature control is very hard to achieve with a wood fired pizza oven because you can only control the temperature of the entire oven, which means that the bottom hearth can get so hot that the crust burns before the top is done. Oftentimes, the difference in the deck temperature and the dome temperature can vary several hundred degrees, resulting in pizzas that are unevenly cooked. - With a wood fired oven, you have to worry about the consistency of the wood. If you are not using the same species, size and moisture content in your wood, it will make baking a pizza difficult. If the wood is inconsistent, the person operating the oven must spend more time on correcting the oven temperature and holding it there.
With a gas oven, there is no fussing with wood. All the heat comes from the stainless steel tube dome burner and tile infrared hearth burner. The beauty of the Delta Heat Pizza Oven is that it comes with a wood rack that holds kiln-dried mini splits. This ingenious feature lets you infuse your pizzas with the delightful flavor and smells of a traditional wood-fired pizza oven.which holds a single log so you can infuse the pizza with the flavor of the wood if you’d like. It’s the best of both worlds! - You don’t have to be a professional to use a gas pizza oven, but you do need expertise and technical knowledge to operate a wood pizza oven. Anyone can use a Delta Heat gas pizza oven including beginners! And with my perfect sourdough pizza recipe below, the process is basically foolproof.

Yield: 5 small pizzas
Ingredients
- 120 grams sourdough starter, fed and at its peak
- 360 grams slightly warm water (about 85 degrees F)
- 530 grams King Arthur Bread Flour
- 25 grams all purpose flour
- 8 grams olive oil
- 13 grams fine sea salt
- fine cornmeal for pizza peel
- favorite pizza sauce
- toppings
Instructions
- Add starter and water to the bowl of a stand mixer. Stir with a fork to loosen starter and disperse starter. Add flour and olive oil. Stir with a spatula to incorporate flour, then put bowl onto stand mixer and attach dough hook. Mix on low speed for about 30 seconds to until no flour streaks remain. Add salt to top of dough and let the dough rest, covered, for 30 minutes.
- After the rest, turn the mixer of medium, speed 4 of a Kitchenaid stand mixer, and mix for 8 minutes. * You will notice this is a very wet dough, and that's okay.
- Remove bowl from mixer and cover with a towel. Let dough sit for 30 minutes, then do 2 sets of stretch and folds around the bowl. Let dough rest for another 30 minutes, then do 2 sets of stretch of folds around the bowl. Cover, and let dough bulk ferment about 4ish more hours if your house is at 70 degrees F (will take less time if it is warmer in your home), until dough is just short of doubling in size.
- Once doubled, place parchment paper on large baking sheet and spray with non-stick spray such as olive oil. Turn dough out onto floured surface and let rest for 15 minutes. The dough will be sticky and that is okay!
- Dust the top of the dough with flour and your hands. Using a bench scraper, cut the dough into pieces weighing about 210 grams each. Flour your hands generously, and stretch a corner of the dough out and bring it back to the middle, doing this with each corner of the dough so you're forming a ball. Use a bit of tension on the surface to make the ball a bit tighter, and close the bottom.
- Place dough into a greased 9×13 inch baking pan. Repeat with all dough balls.
- At this point you can let the dough rise on the counter for 45 minutes, for its second rise, until it has grown a bit and is puffier. Or you can put the pan with dough balls straight into the refrigerator, covered, and leave them in for 6 to 48 hours. Take dough out an hour before you want to make the pizza.
- 1 hour before you're ready to make the pizzas, lay out all of your ingredients at a station so you can work quickly once the dough is on the pizza peel.
- 20 minutes before you're going to cook the pizza, turn on both the hearth and dome burners of the pizza oven. I turn the dome to high and the hearth to medium. Use an infrared gun to test top of the dome, which you want to be around 750 degrees F and the hearth to be around 450 degrees F.
- Liberally dust your pizza peel with fine ground cornmeal.
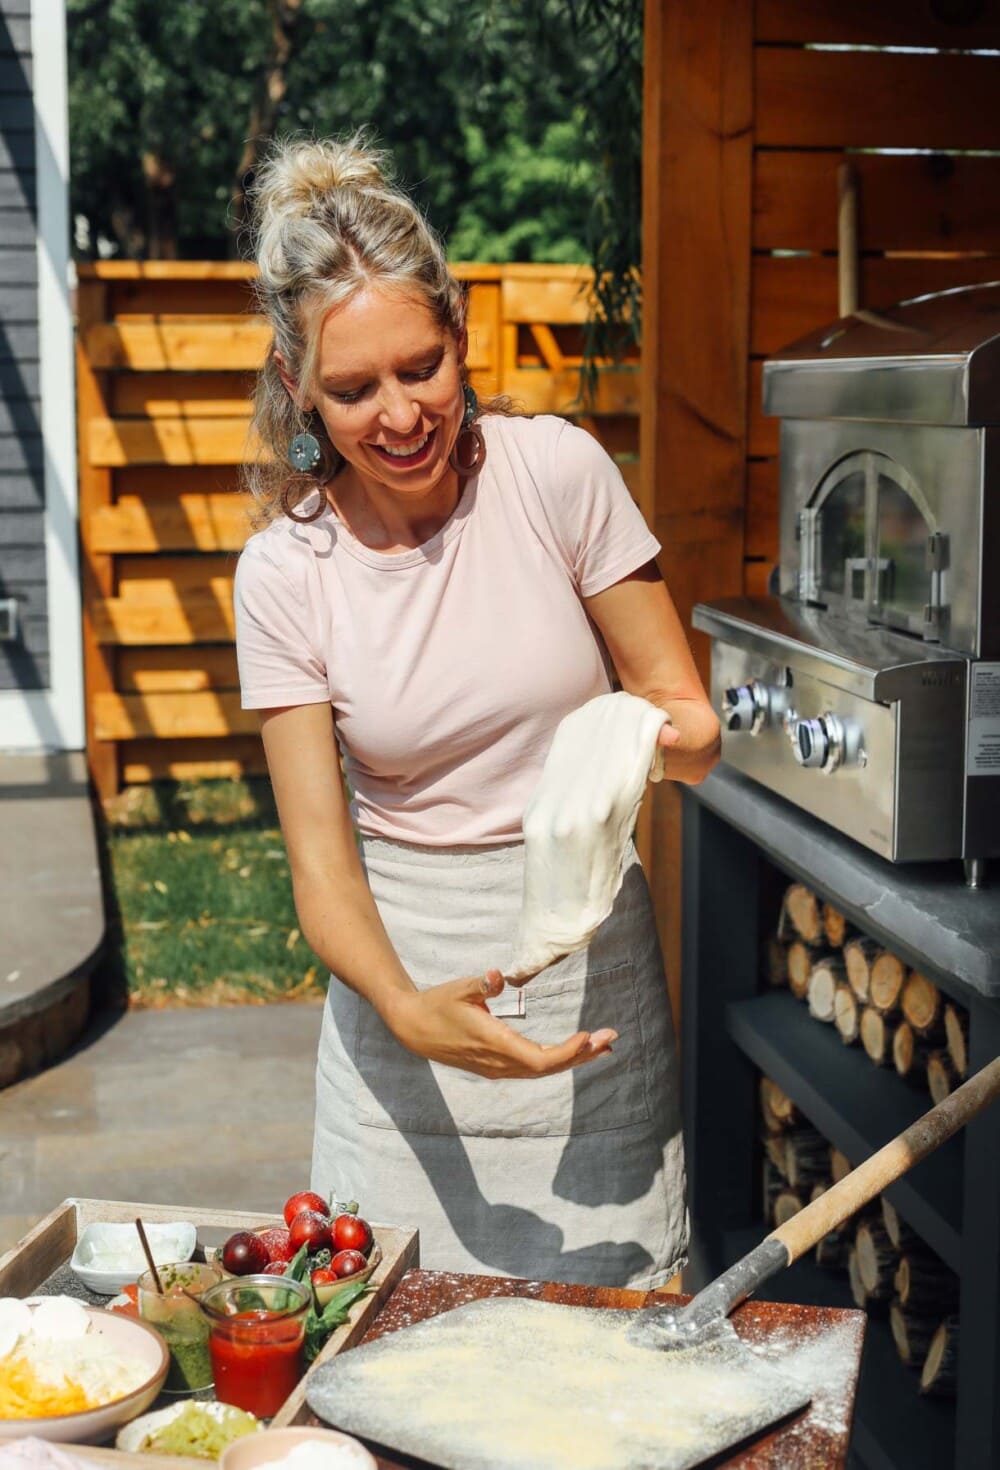
- Dust top of dough ball with flour. With floured hands, pick up a dough ball and hold up with two hands on corners of the dough. The dough will start to droop downward with gravity, and you'll rotate the dough clockwise, like you're turning a steering wheel. And it will be a bit sticky, just use more flour as needed. That's okay! Bring it down to the pizza peel, and lightly press out into a circle, stretching the corners. Do NOT use a rolling pin. This will make the dough too thin, resulting in a tougher crust. You're aiming for each pizza to be around 7-8 inches in diameter. Don't try to make the biggest pizza. Keeping it smaller will result in the fluffiest baked dough. Stretch and adjust the dough a little more, aiming to position one edge of the pizza all the way at the front edge of the peel.
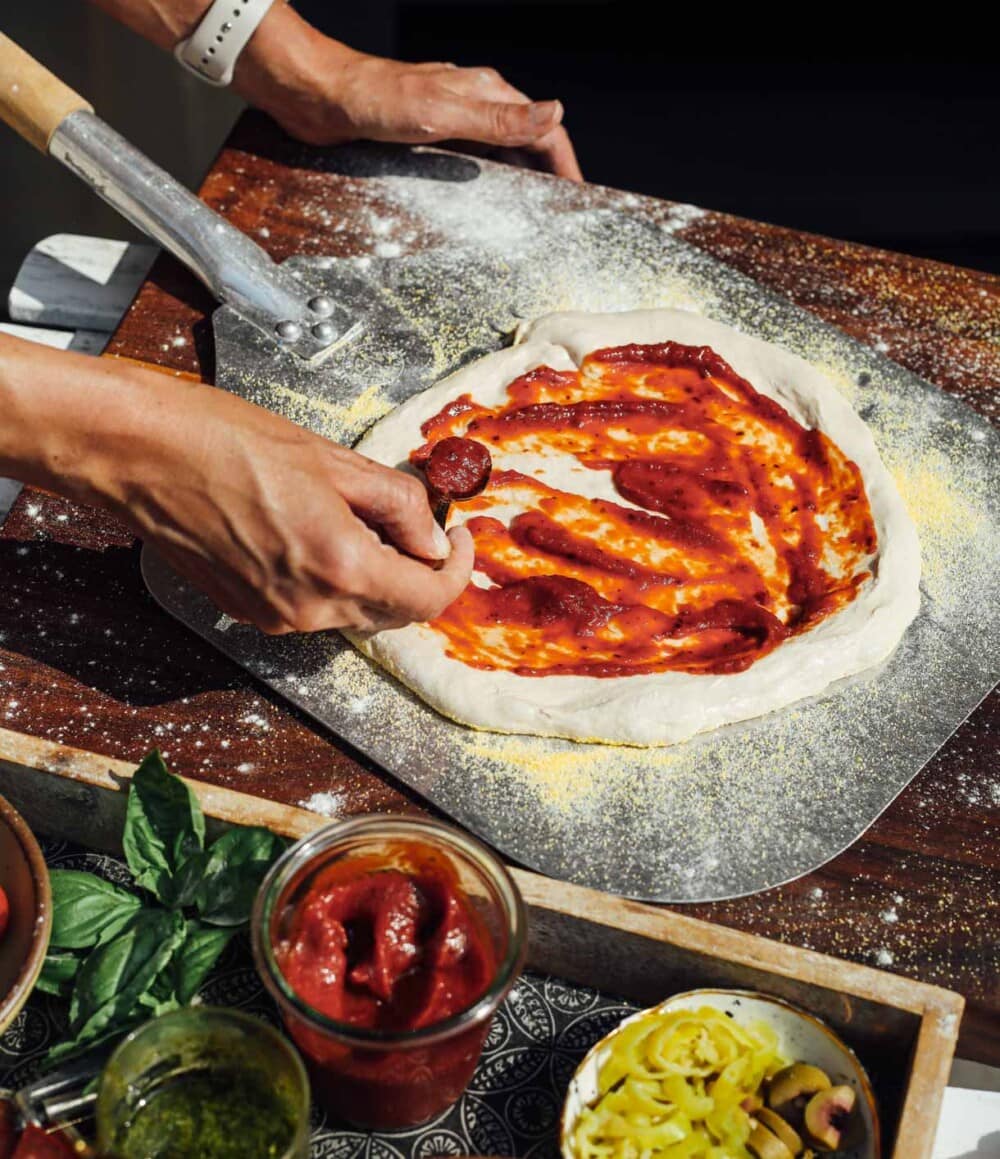
- Spread with a light amount of sauce, and put the the rest of your toppings on, including cheese. Error on the side of less toppings that piling it super full, to be sure the crust can handle the weight. Check the temperature of the dome and hearth to make sure they are about 750 degrees F for the dome and 450 degrees F for the hearth.
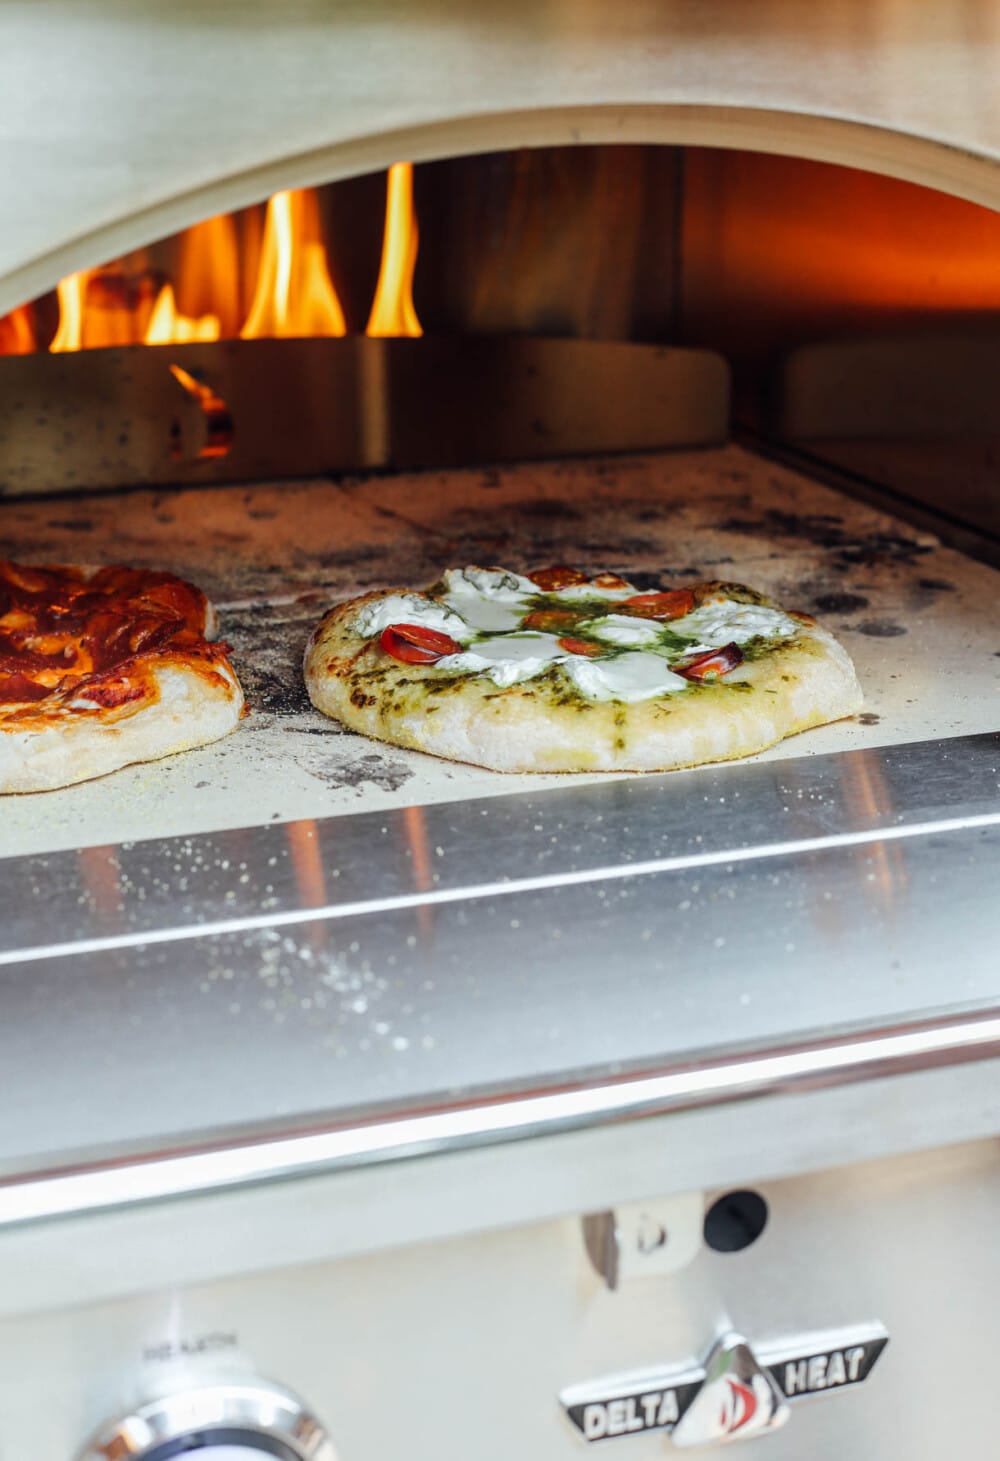
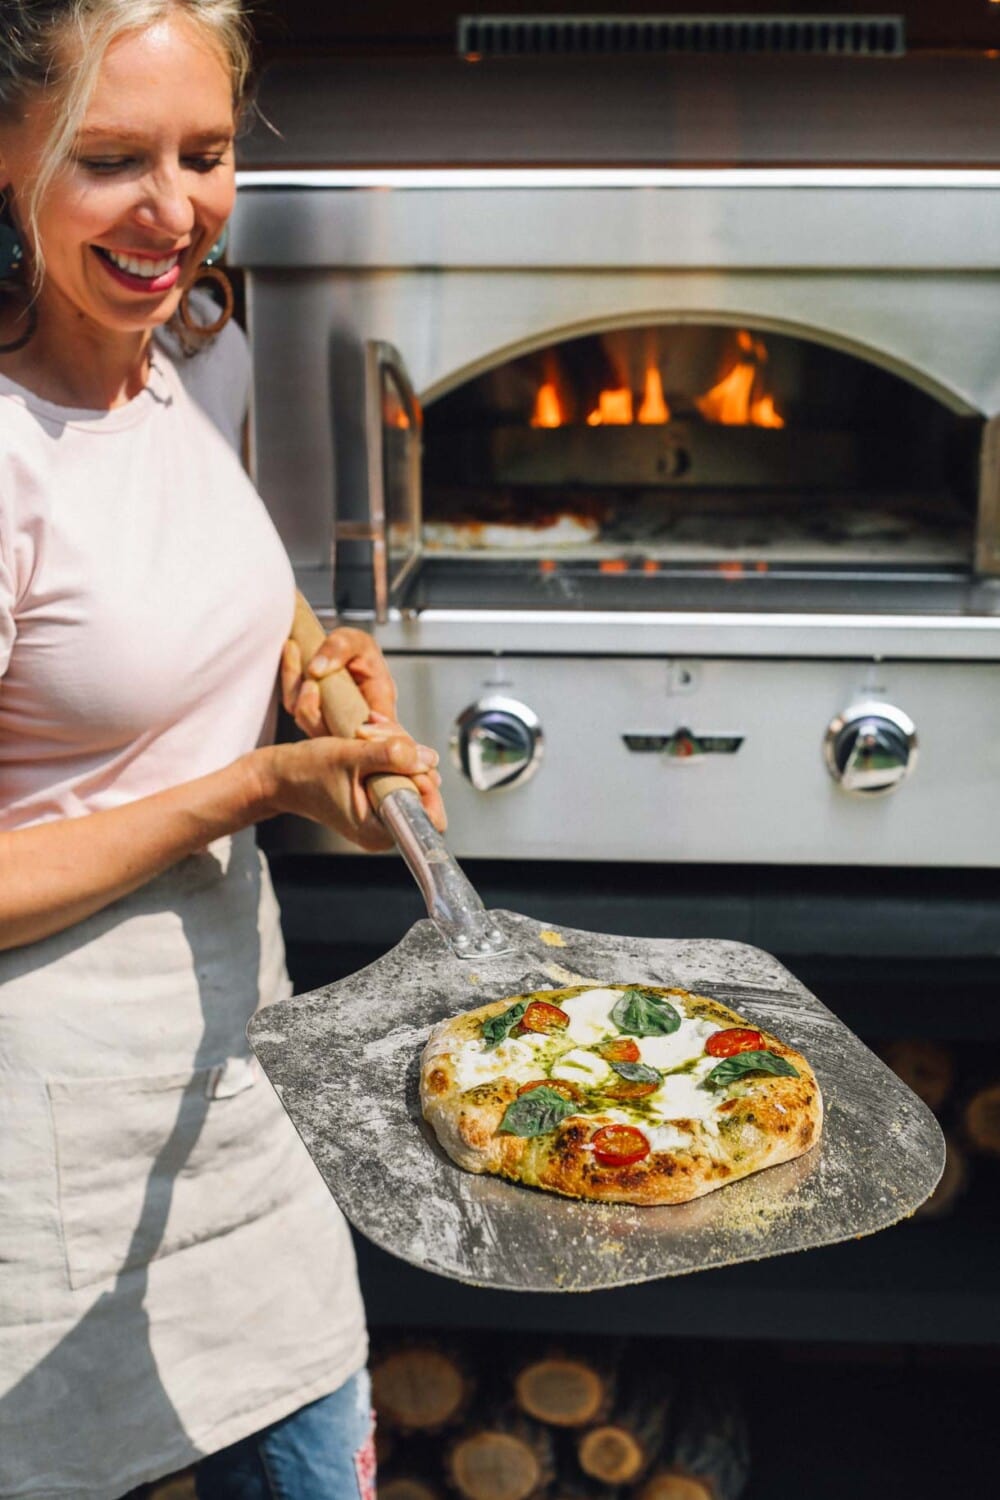
- Shimmy the pizza to make sure no edges are sticking to it. If so, gently lift that edge of dough up and put down more cornmeal. Open the doors to the pizza oven and shimmy the pizza onto the stone. Close the doors and let cook for 4 minutes, then check it to see how the top and bottom are coming along. You can cook two pizzas at once, which is what I do. When done to your liking, open the doors and remove the pizzas with your pizza peel. Set on wire rack and let cool for 2 to 3 minutes before slicing. Repeat with remaining dough.
Notes
*this is a WET dough, and that’s okay! use flour as you need while working with the dough after it’s bulk ferment, to keep it from sticking to your hands or surface.

How to Make Sourdough Pizza Crust
- Unlike making sourdough bread, sourdough pizza dough is mixed with a stand mixer, then rises on its own with just 2 simple sets of stretch and folds to help it gain strength.
- After the bulk fermentation, you’ll use your bench scraper to cut the dough into equal balls of dough, about 210 grams each. I don’t like to go much bigger than that because at the point, shaping into the crust gets more difficult.
p.s. — If you’re new to sourdough, here are my Best Tips for Maintaining a Sourdough Starter!
- The dough balls can rest on the counter for about an hour for their second rise, or you can stick them into the refrigerator for as long as two days, then use when ready!
When you’re working the balls into the crust, the dough will be wet. And that’s okay! Just make sure your hands are floured and the pizza peel too. You’ll get the hang of it – it just takes a little practice.
How long does it take to cook pizza in a gas pizza oven?
Because we’re cooking at super high temperatures, a pizza will cook fast, in just 5 to 6 minutes! I like to check the bottom of the crust by using the pizza peel to lift part of it around the 4 minute mark to make sure it isn’t burning.
With this in mind, you can make a large amount of pizzas in a short amount of time, which is why I love using my pizza oven for parties. The Delta Heat Pizza Oven is large enough to easily fit two pizzas, so I can churn out 10 pizzas in less than 40 minutes.

Cleaning your Outdoor Pizza Oven
With each usage, you will naturally get debris inside of your pizza oven from burn off. After the pizza oven has cooled off completely, it’s important to clean it out. We’ve found the easiest way is to use a brush and then a shop-vac or hand held vacuum to remove charred crumbs. By doing this, you won’t get old burnt pieces onto the fresh dough that you’ll be cooking. One thing to note; do not get the stones wet per manufacturer’s instructions.
Clean the exterior: Wipe down the exterior of the oven with a damp cloth to remove dust and dirt. Since ours is made of stainless steel, I then use this non-toxic stainless steel cleaner to polish the outside of the pizza oven. This will keep it looking beautiful and shiny!
Did you make this?
tag @heartbeetkitchen on instagram and hashtag it #heartbeetkitchen
July 31, 2023
Michelle
November 20, 2025
I baked this in my conventional oven on a pizza stone at 5oo degrees, and it worked well. We tried the crust both lightly loaded with sauce and toppings before baking, and also par-baking the crust alone for two minutes before adding any toppings… Both were great, but par-baked is the way to go for a crispy crust with a nice chewy interior! My dough balls were in the fridge for 48 hours before being set out for an hour to let both the stone and the dough come to temperature. It was a great dough to work with, neither sticky nor too stiff to stretch. I’ll be saving your recipe to make again, thank you.
Laurie Lehman
June 2, 2025
Not so lucky to have an outdoor pizza oven. Is there a way to make this pizza in regular oven?
Amanda Paa
June 2, 2025
Hi! I use this bubbly sourdough pizza crust recipe for my indoor oven!
Patti
May 31, 2025
I love your recipes! Can this pizza recipe be cooked in a regular indoor oven?
Amanda Paa
June 2, 2025
Hi Patti! I use this sourdough pizza crust recipe for my indoor oven!
Laurie Lehman
June 2, 2025
What are the instructions for baking in a regular oven? Like to try as looks so good.
Amanda Paa
June 2, 2025
Hi! I use this bubbly sourdough pizza crust recipe for my indoor oven!
Miriam Attard
November 16, 2024
So good!! And relatively easy. I wish I had an outdoor pizza oven!!
Miriam Attard
August 15, 2024
I LOVE sourdough pizza! Can’t wait to try this recipe. Can the dough be frozen after the second rise?
Amanda Paa
August 16, 2024
hi miriam! the wild yeast in sourdough does not like to be frozen. i recommend par baking the crust and freezing instead.
Eugenia
July 14, 2024
BEST sourdough pizza recipe!!! We made this tonight and it was absolutely delicious.
Caitlin
September 25, 2023
Are metal Kitchenaid bowls a problem for this recipe? I’ve always heard that using metal bowls/utensils are a no-no with sourdough. Thanks! :)
Amanda Paa
September 25, 2023
Hi! Stainless steel is okay to use, just know that the dough will take longer to rise because it retains cold.
Michele
August 6, 2023
I love reading your emails and your site, so thank you for your efforts! And also the delicious recipes you come up with and your kindnesses with all the kitties, which is truly special! But how do you keep yourself in such good shape eating all that delicious looking pizza?!